KSC Cooking Demonstrations
Why? well, to show you...
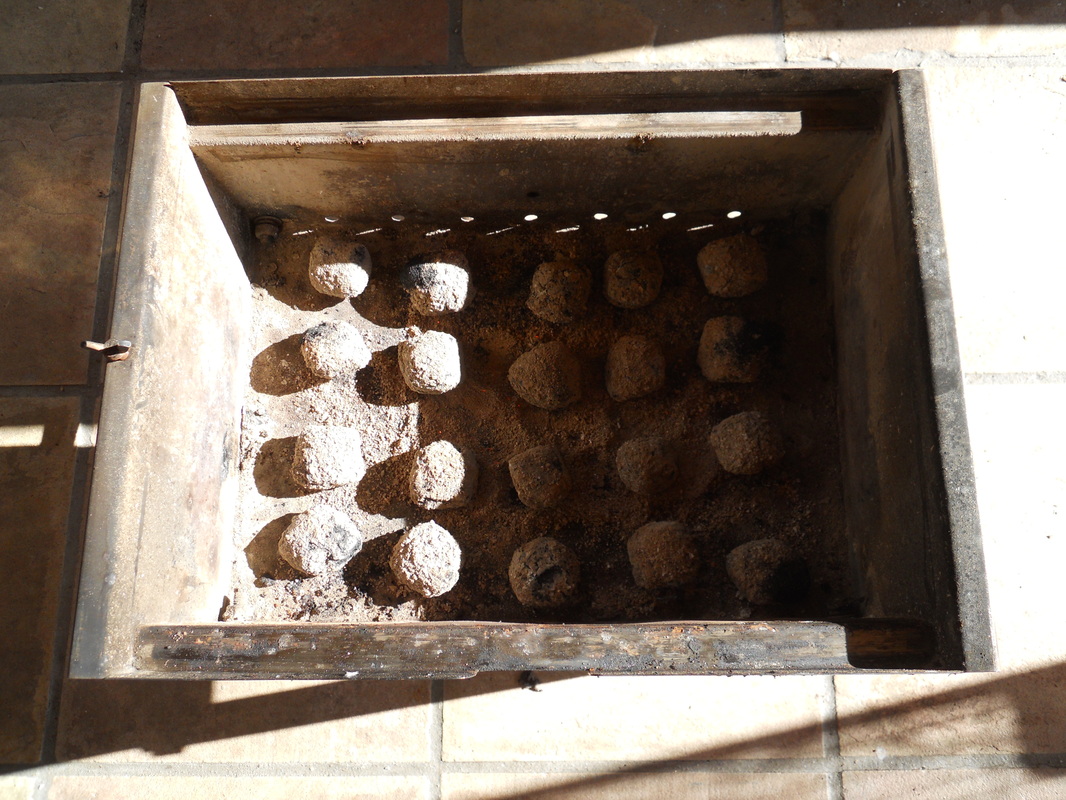
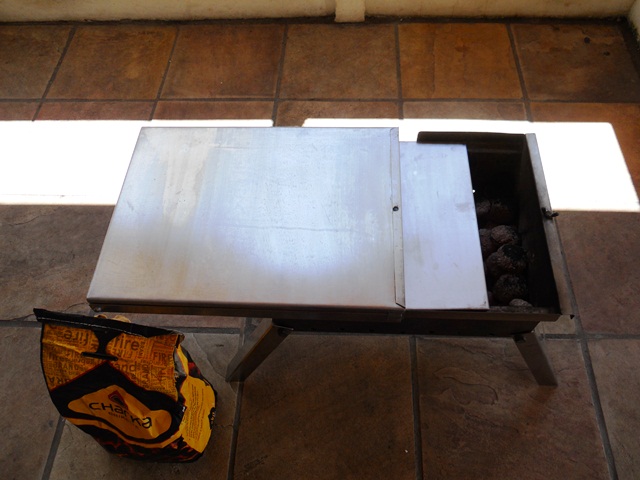
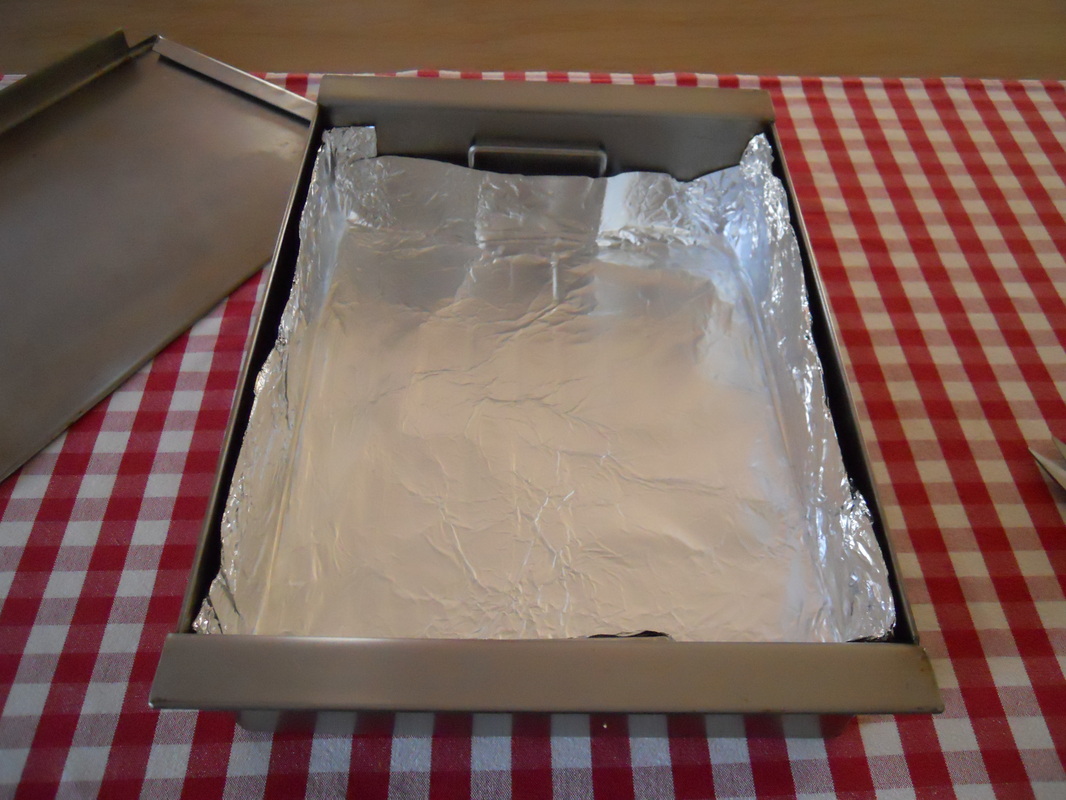
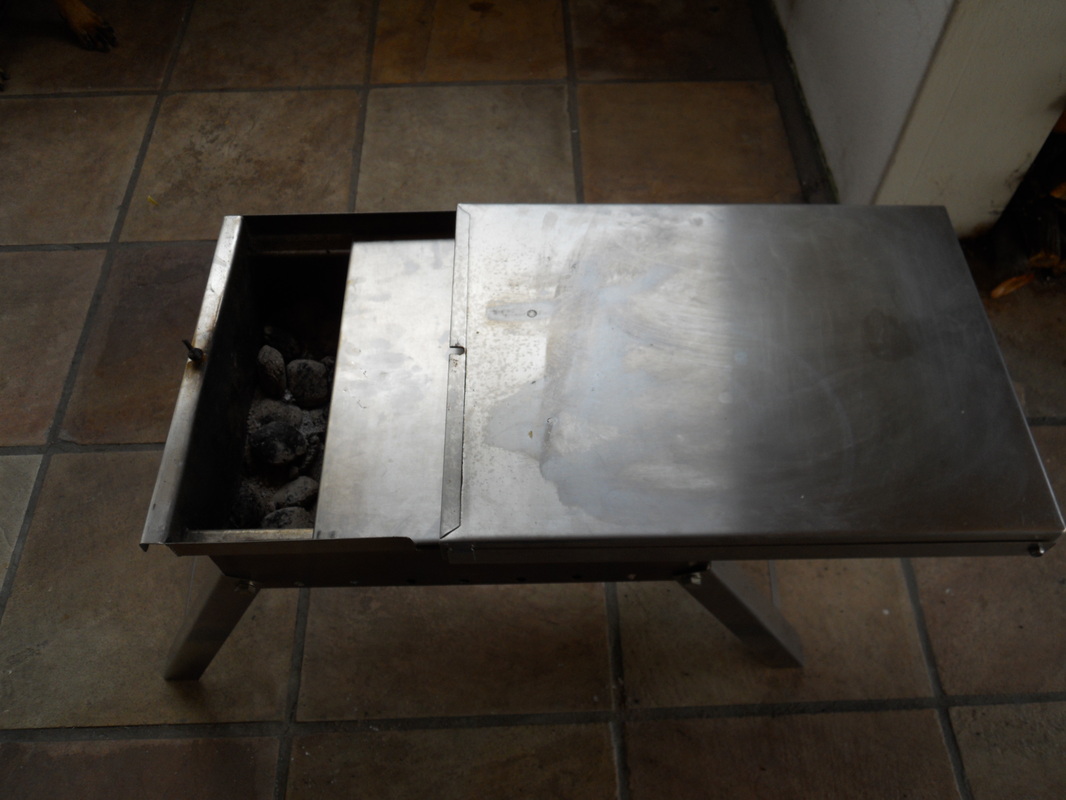
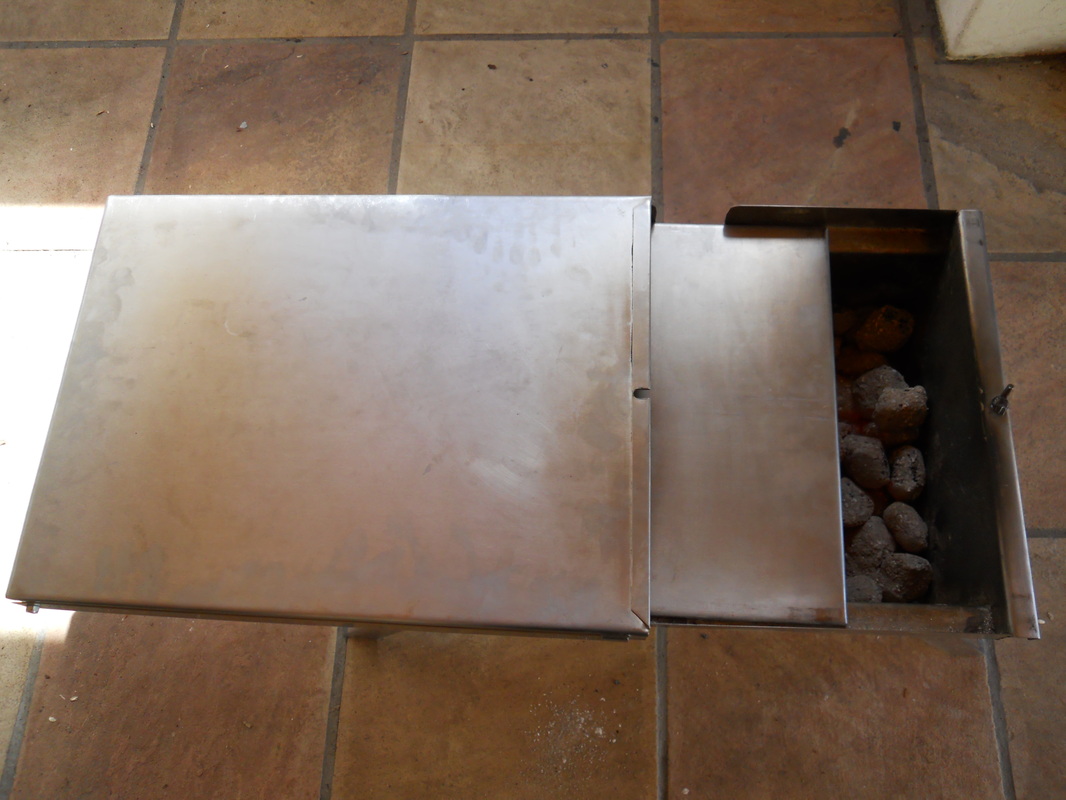
- How to get the most out of your KSC Braai Items, combined it's a Braai, Oven AND Mini Smoker!
- How to cook with the minimum amount of dishes/ utensils and appliances while camping or 4x4-ing,
- How to cook a variety of meals, the options are truly astounding,
- How to recycle left-overs from a previous nights braai or food close to it's expiry date,
- How to cook quick, non complicated meals that's easy to serve at a campsite or on the road,
- How to cook healthy, tasty home style meals that are great for adults but also easy on young tastebuds,
- AND to give you great meal ideas that will contribute to memorable camping and 4x4 meal times!
- We like to write A LOT so remember to scroll down this page to view all our cooking demo's.
Campfire Chocolate cake
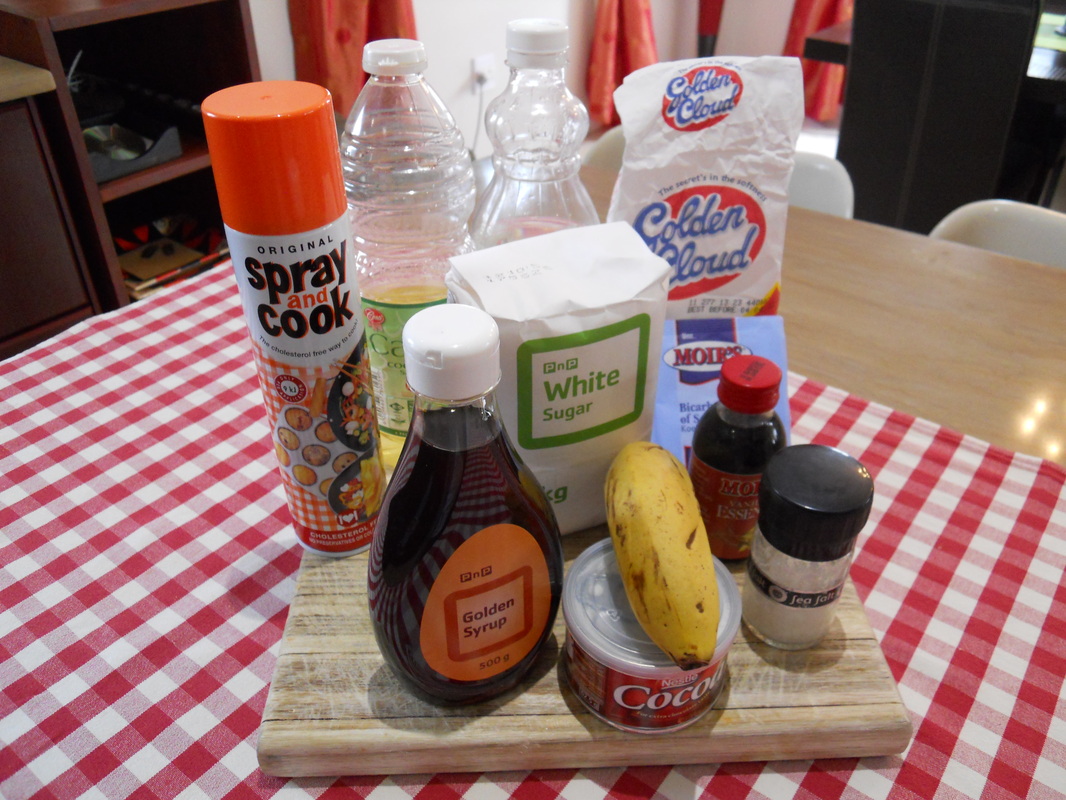


"Koek Innie Bos", who would've thought!
To bake this delicious cake you'll need the following ingredients: 3/4 Cup Cake Flour, 1/2 Cup Sugar, 3 Table Spoons Cocoa Powder, 1/2 Teaspoon Bicarbonate of Soda, 1/4 Teaspoon Salt, 1/2 Teaspoon Salt, 1/2 Teaspoon Vanilla Essence, 1/4 Cup Water, 1 Banana Mashed. 1 Table Spoon Syrup, 1/2 Table Spoon Cider Vinegar.
To bake this delicious cake you'll need the following ingredients: 3/4 Cup Cake Flour, 1/2 Cup Sugar, 3 Table Spoons Cocoa Powder, 1/2 Teaspoon Bicarbonate of Soda, 1/4 Teaspoon Salt, 1/2 Teaspoon Salt, 1/2 Teaspoon Vanilla Essence, 1/4 Cup Water, 1 Banana Mashed. 1 Table Spoon Syrup, 1/2 Table Spoon Cider Vinegar.
|
|
For more detailed photos with comments of this demonstration and the recipe's please follow the link to our Facebook Page.
Smoked Snoek
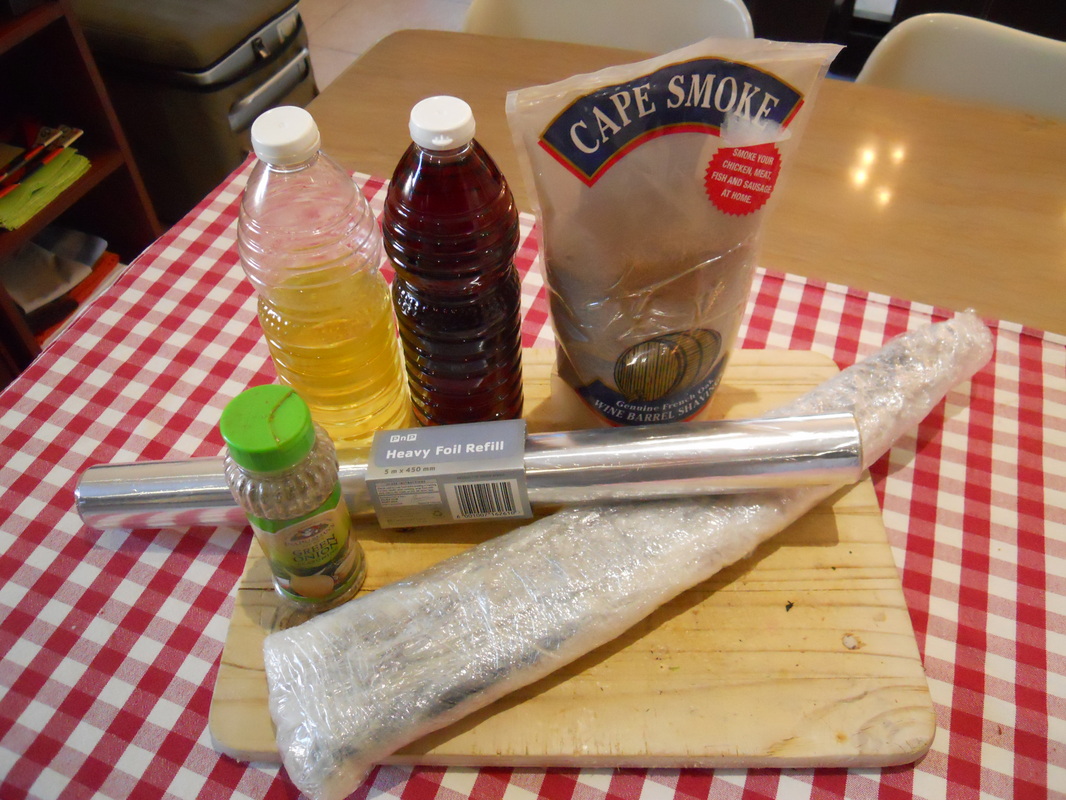
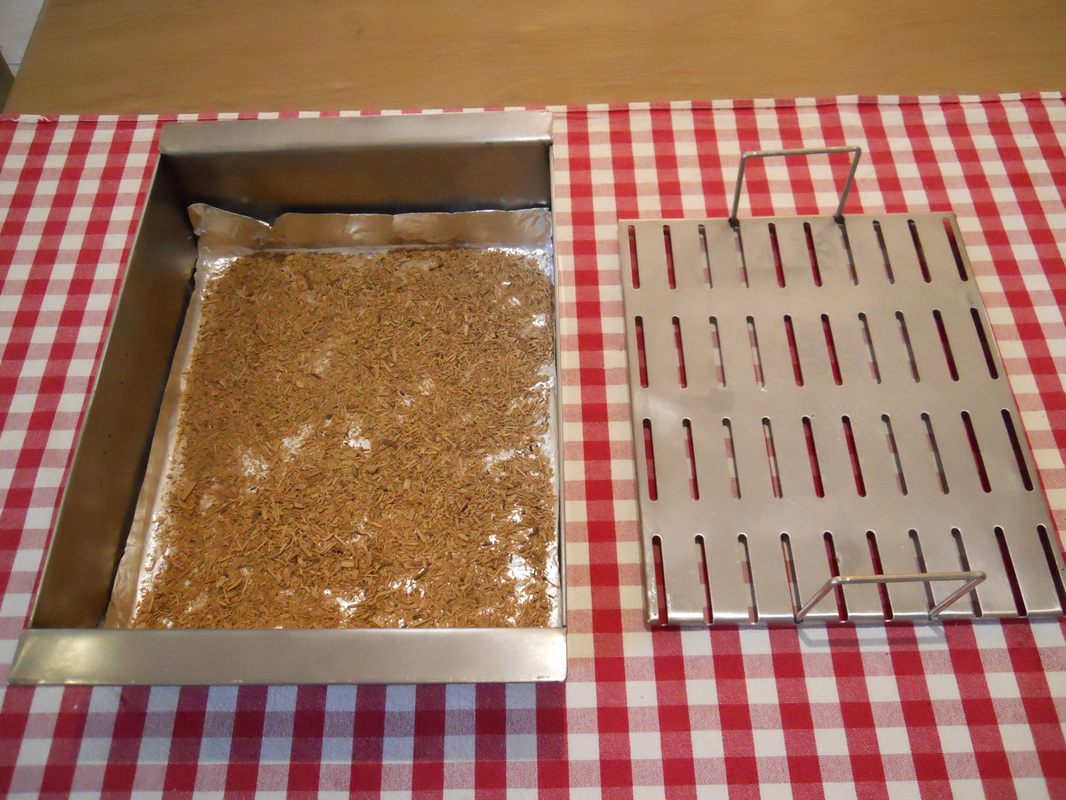
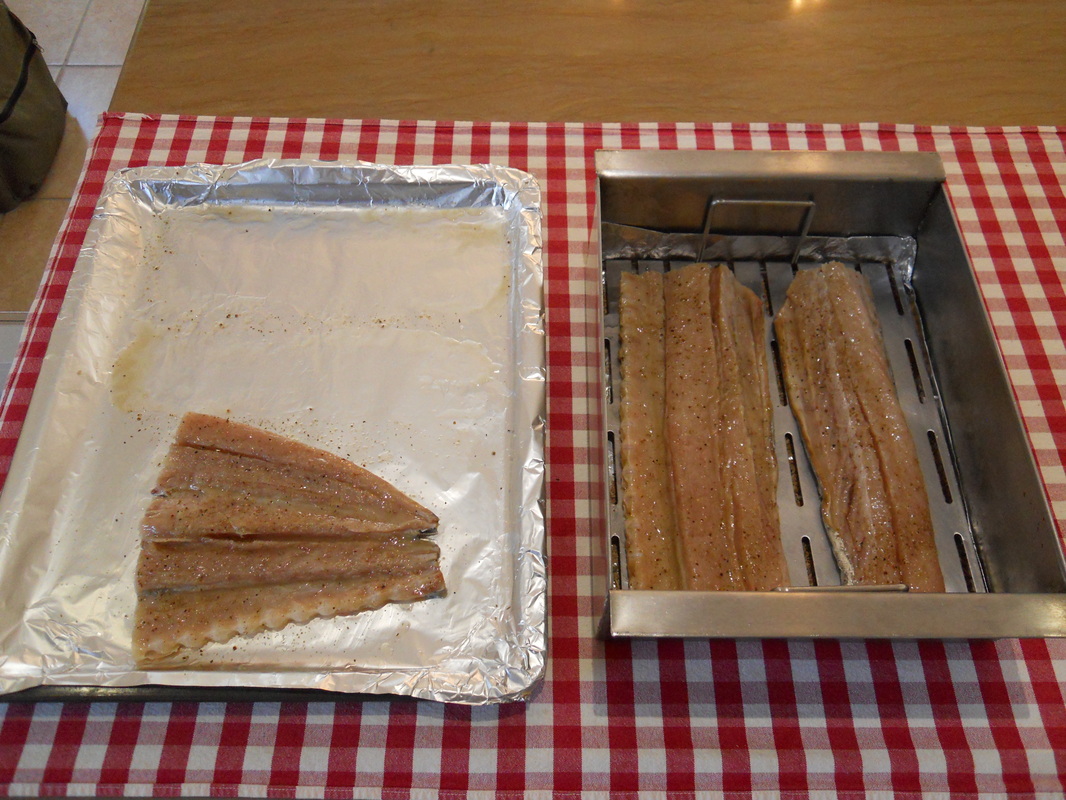
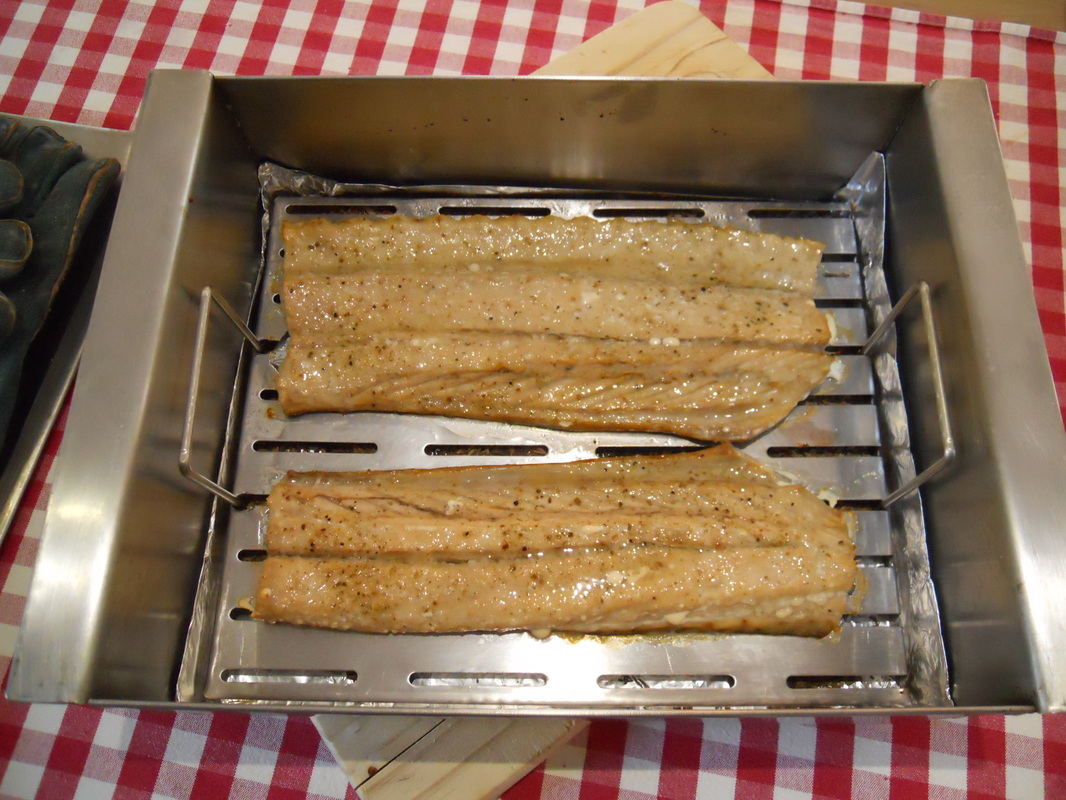
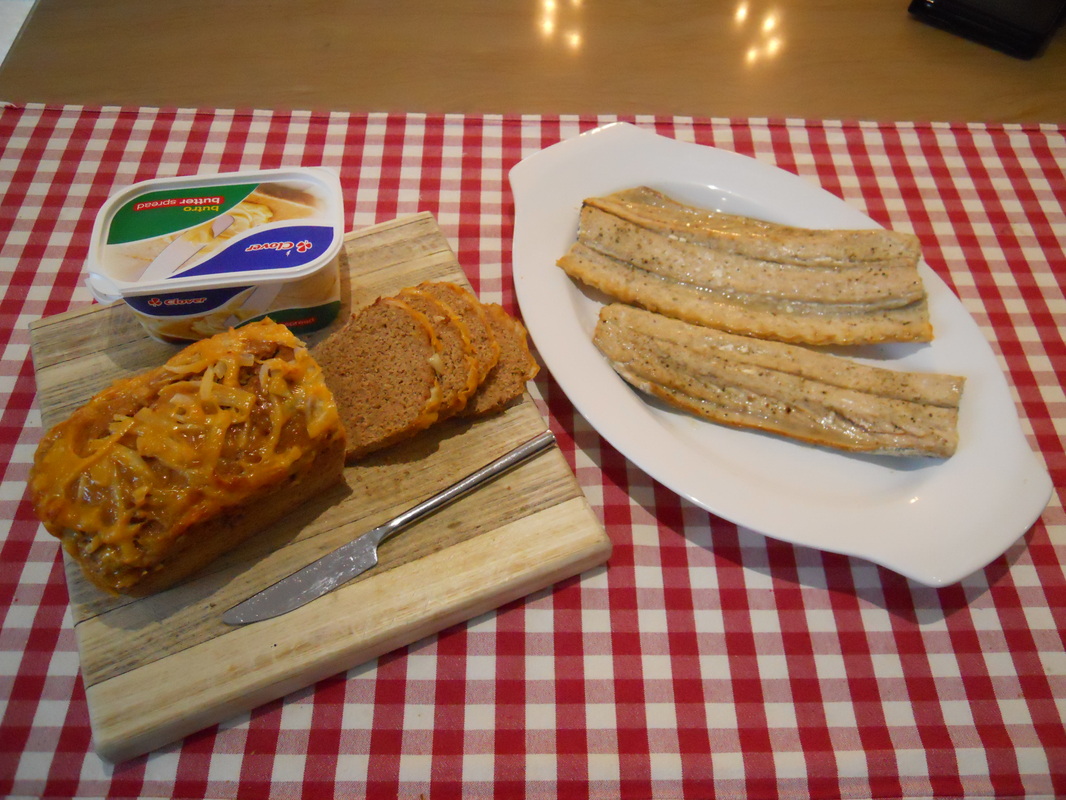
It's SUPER easy to make your own deliciously tasty and juicy smoked snoek in your KSC Braai & Braai Bak!
You'll need 1 fresh Snoek, Vegetable Oil ( we used Canola Oil), Vinegar, your favourite Fish Spice (we used Ina Paarman's Green Onion Spice) and some wood shavings. Please make sure that you buy a pre-salted Snoek and if not, salt and wash it off before smoking.
You'll need 1 fresh Snoek, Vegetable Oil ( we used Canola Oil), Vinegar, your favourite Fish Spice (we used Ina Paarman's Green Onion Spice) and some wood shavings. Please make sure that you buy a pre-salted Snoek and if not, salt and wash it off before smoking.
|
|
For more detailed photos with comments of this demonstration and the recipe's please follow the link to our Facebook Page.
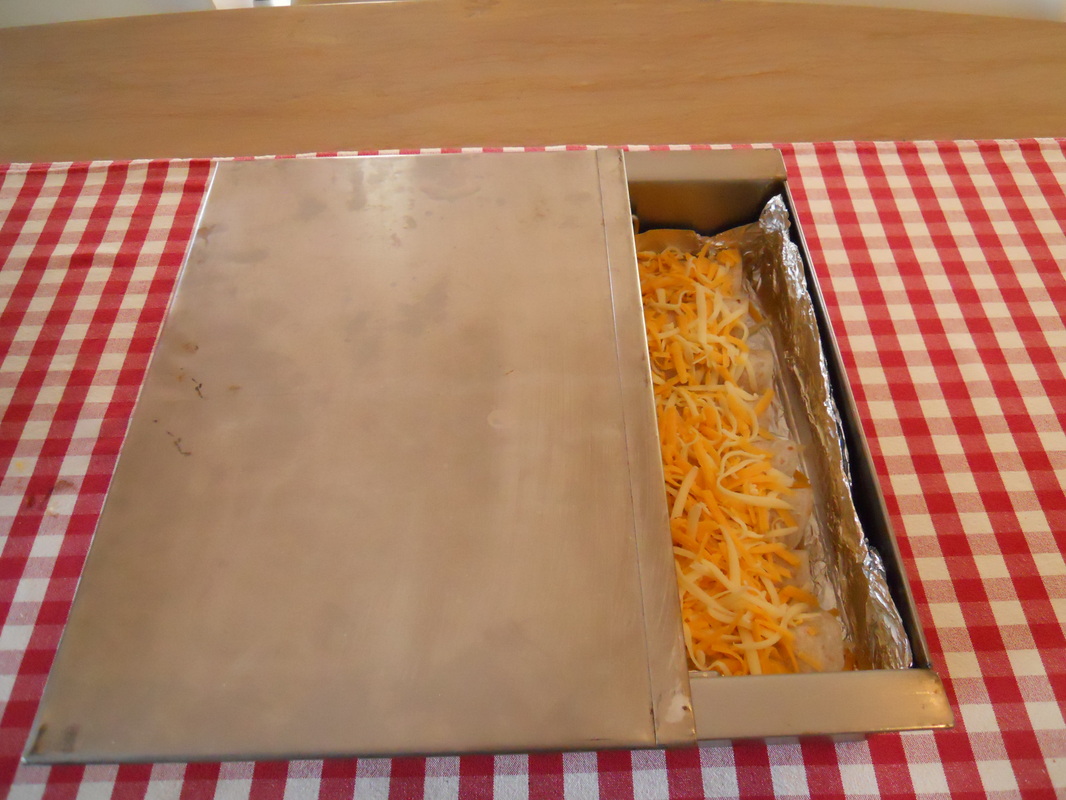
Creamy Potato Bake

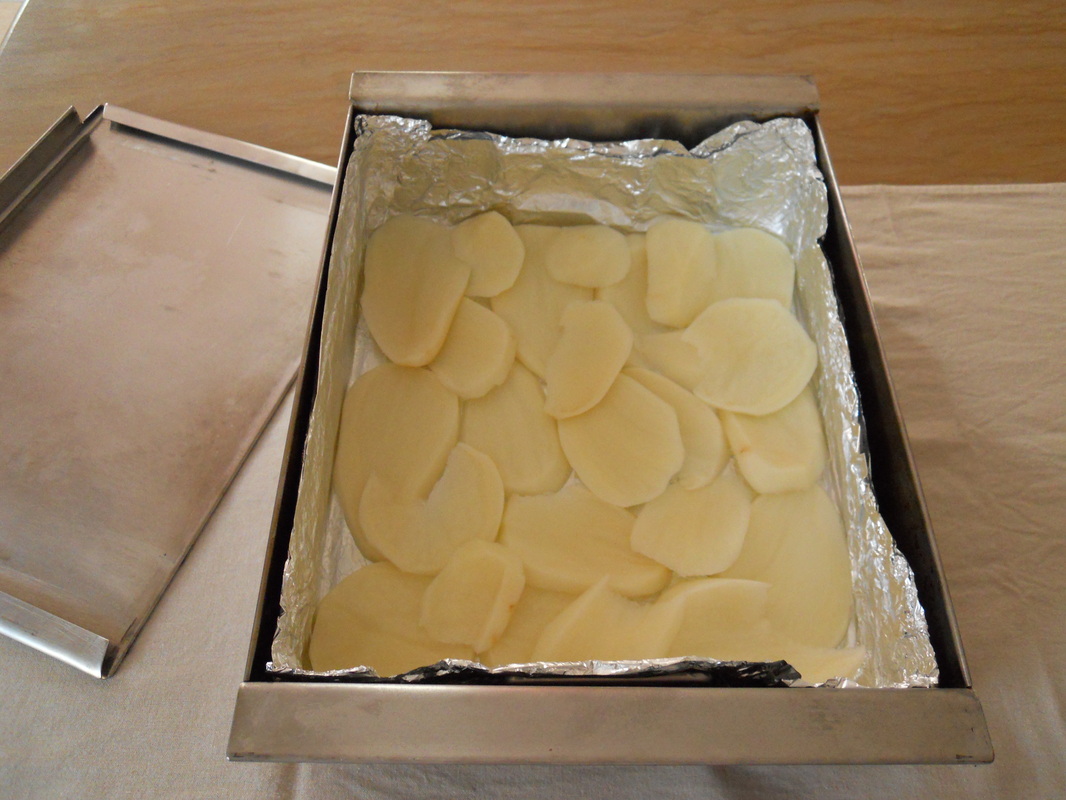
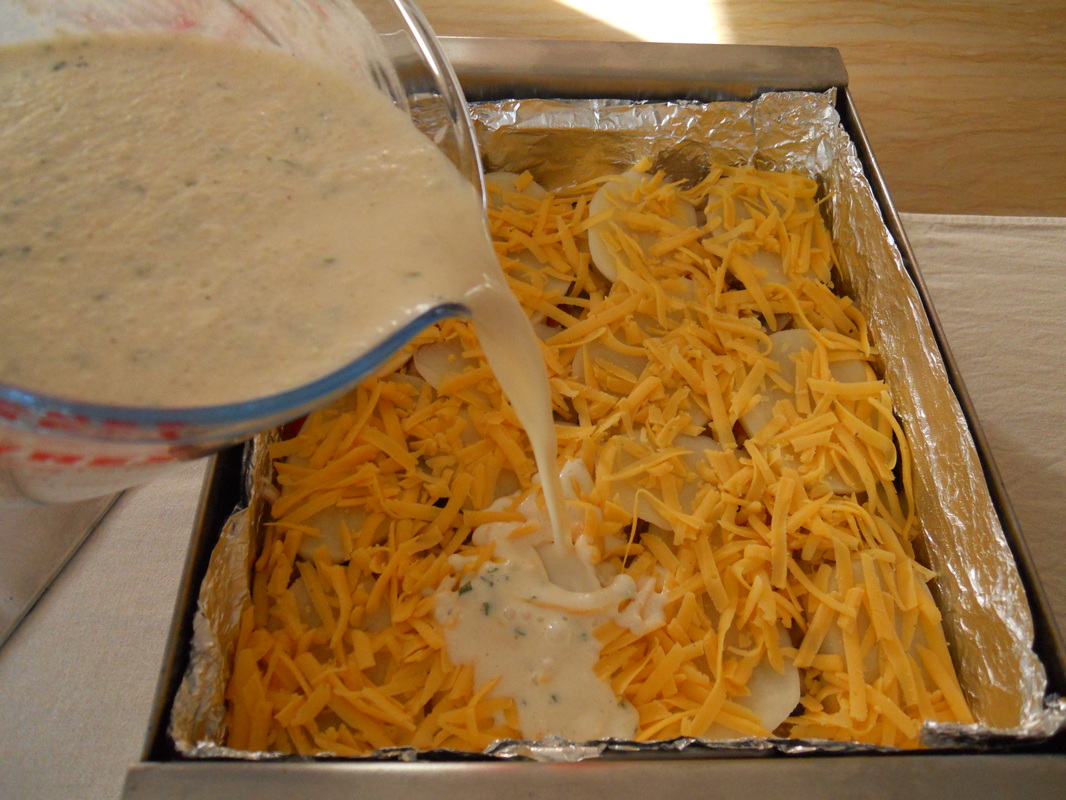

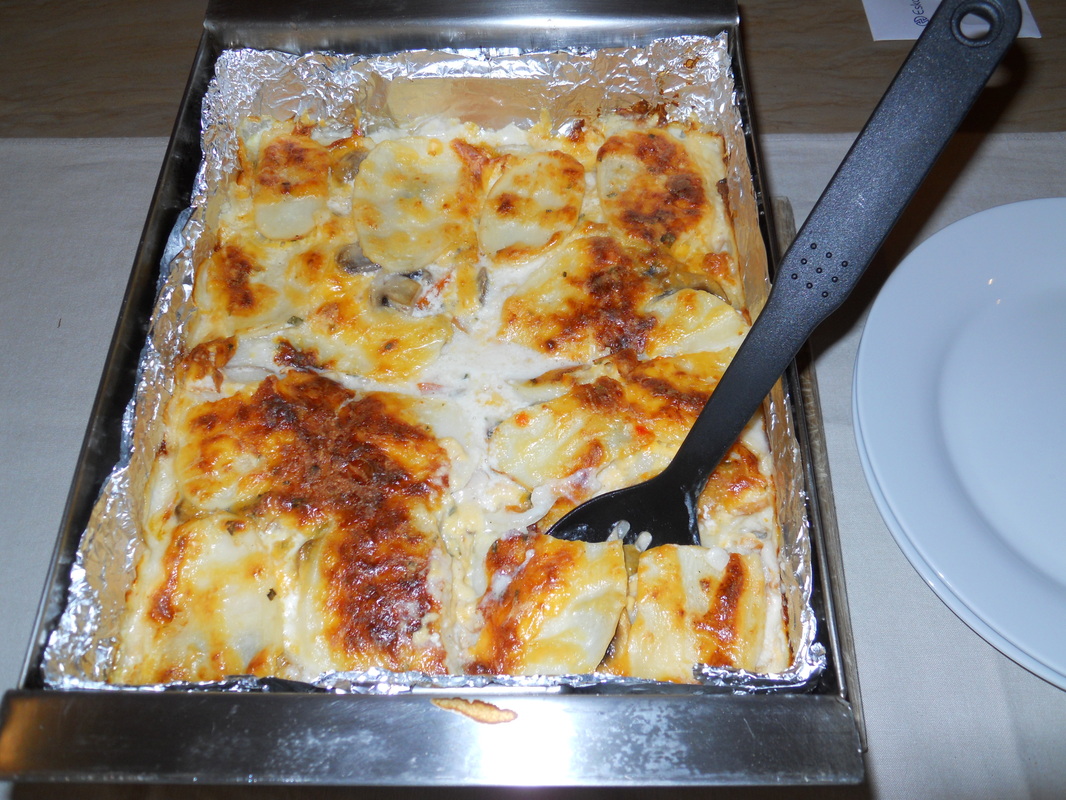
Potato Bake is versatile as a decadent side-dish or a delicious and filling main meal when spruced up with some extra filling bits.
For the Potato Bake we used the following ingredients: 7 x Medium Potatoes, 1/2 Sliced Sweet Red/ Orange Pepper, 1/2 Sliced Onion, 2 x Sliced Smoked Chicken Breasts, Sliced 250g Punnet of Mushrooms, 250ml Grated Cheddar Cheese, 2 x Potato Bake Flavouring & 800ml Milk.
For the Potato Bake we used the following ingredients: 7 x Medium Potatoes, 1/2 Sliced Sweet Red/ Orange Pepper, 1/2 Sliced Onion, 2 x Sliced Smoked Chicken Breasts, Sliced 250g Punnet of Mushrooms, 250ml Grated Cheddar Cheese, 2 x Potato Bake Flavouring & 800ml Milk.
|
|
For more detailed photos with comments of this demonstration and the recipe's please follow the link to our Facebook Page.
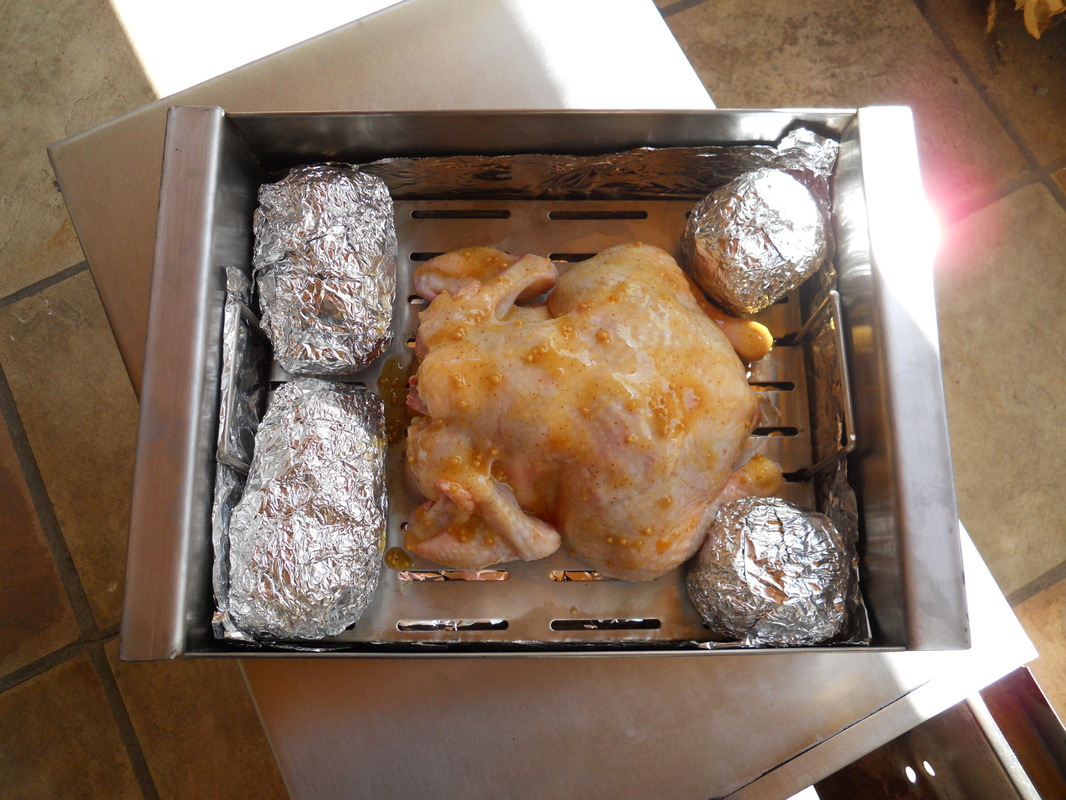
Smoked chicken breasts
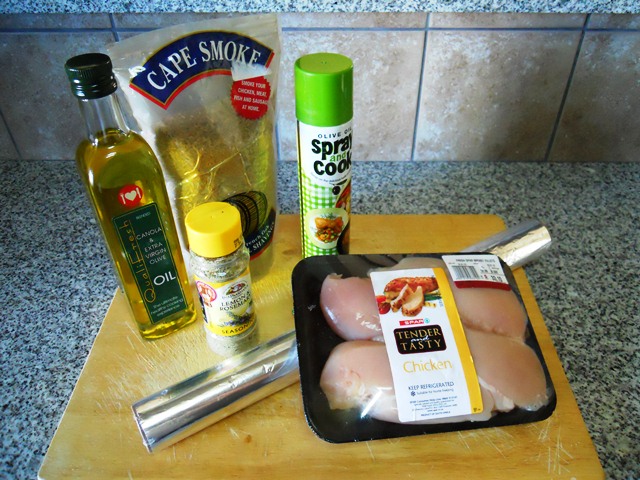
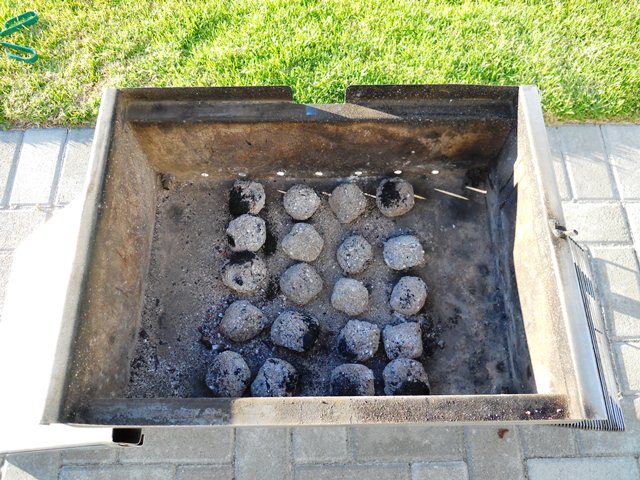
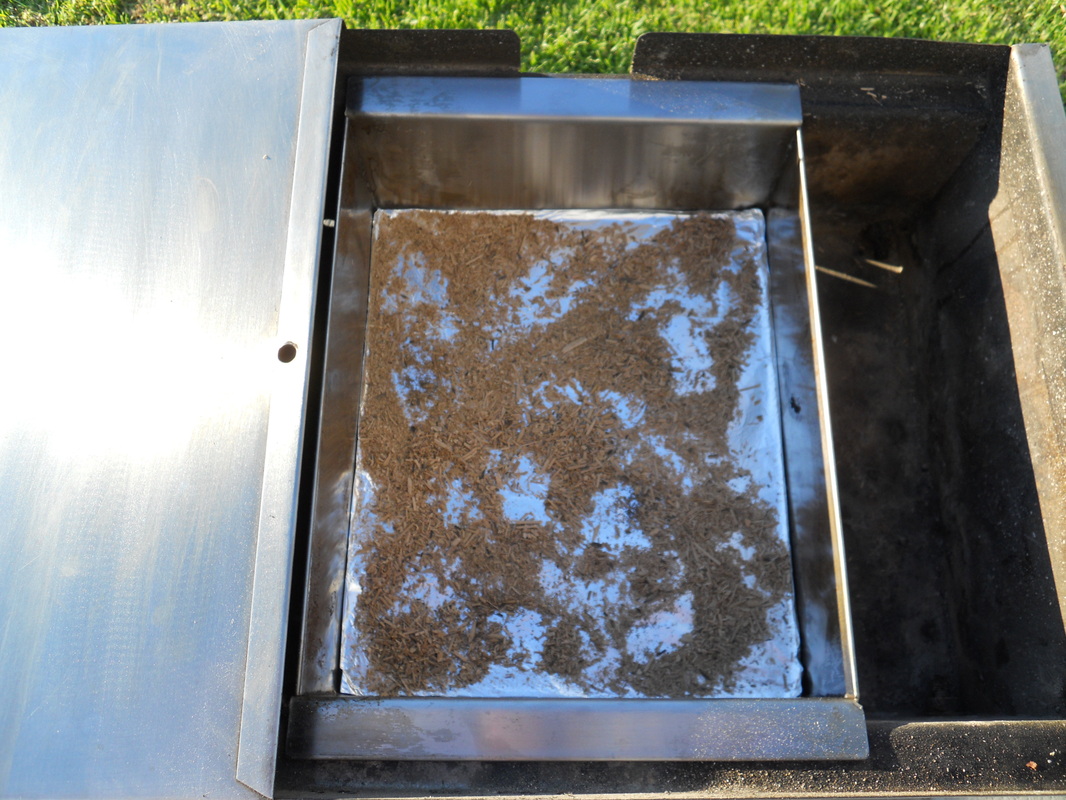
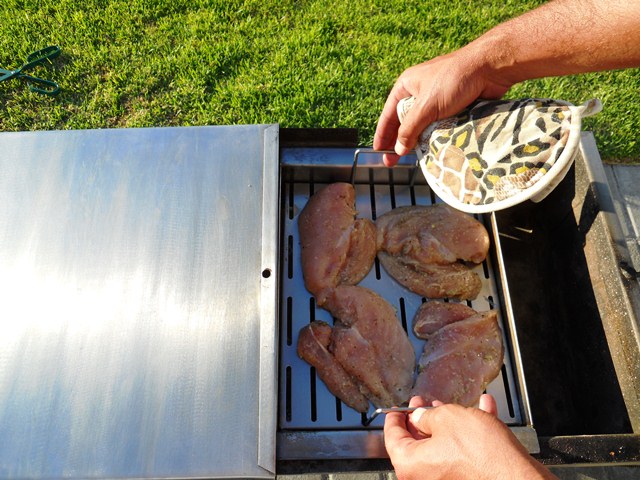
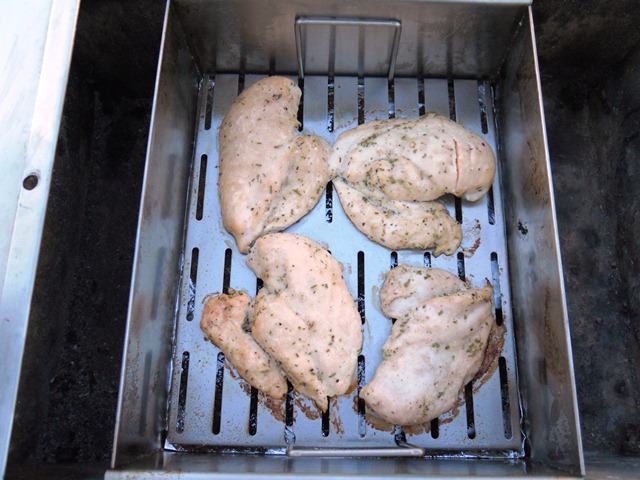
As promised, this month we show you yet another way to use your already SUPER versatile KSC Braai Set! Our cooking demo to kick off the New Year is Smoked Chicken Breasts. It's really quick, easy AND tasty!
All you need is four Chicken Breasts, Olive Oil, Chicken Spice of your choice, Spray & Cook, Tinfoil and Wood Shavings.
All you need is four Chicken Breasts, Olive Oil, Chicken Spice of your choice, Spray & Cook, Tinfoil and Wood Shavings.
|
|
For more detailed photos with comments of this demonstration and the recipe's please follow the link to our Facebook Page.
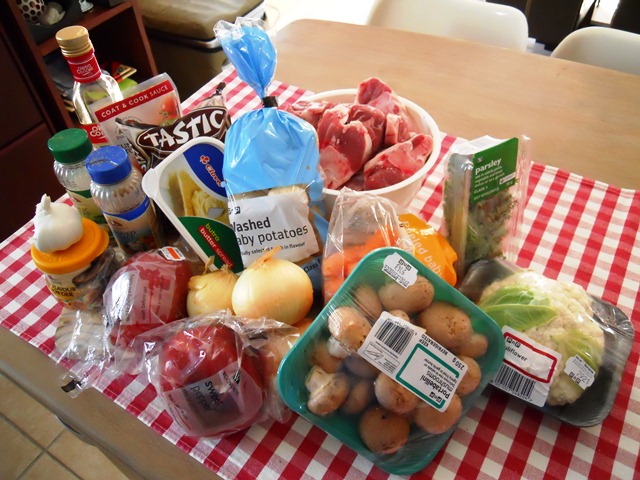
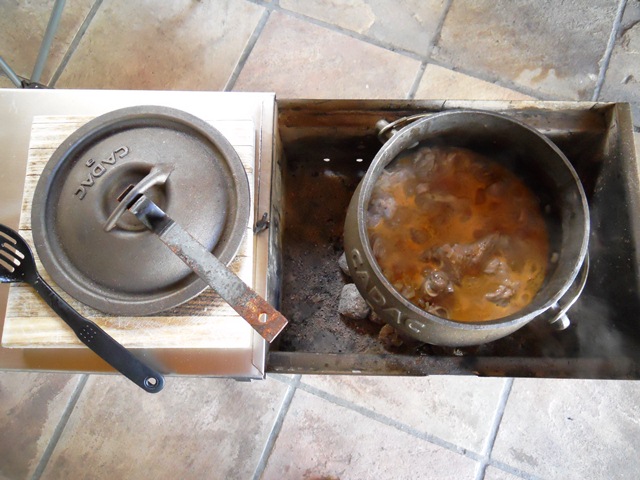
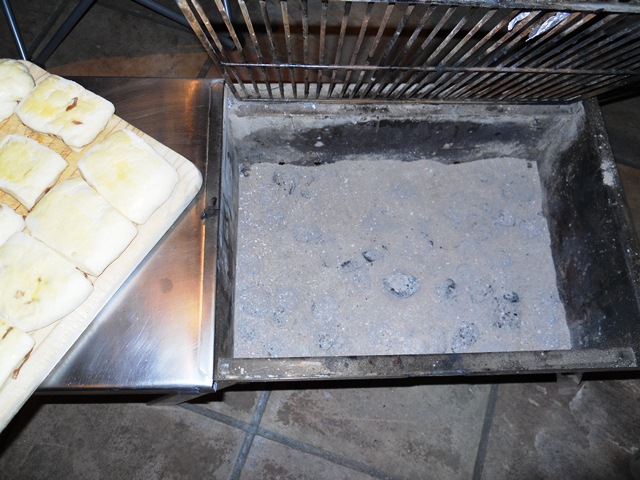
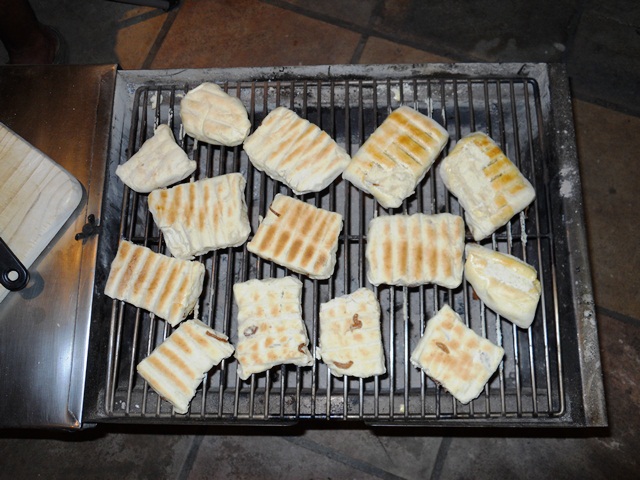
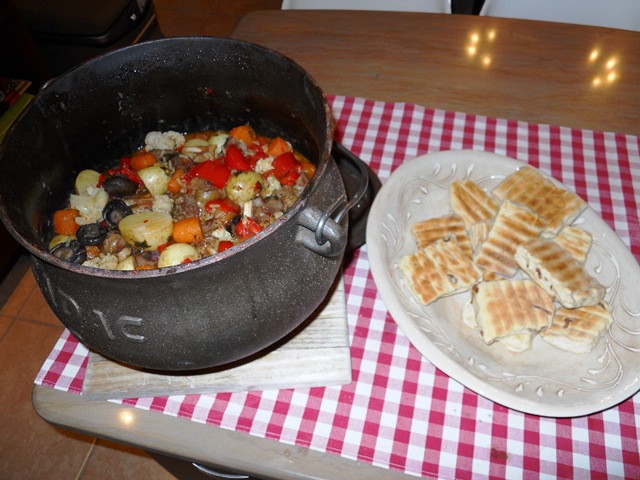
Festive Lamb Knuckle & Vegetable Potjie And rooster koeke
What can be more festive and
social than a LEKKER Christmas or New Year’s Potjie with home-made Rooster
Koeke when on the road 4x4-ing or camping?
Our cooking demo for December is just that, a simple but SUPER tasty Lamb Knuckle & Vegetable Potjie (compliments to Ina Paarman) and SUPER easy home-made Rooster Koeke with Caramelized Onions.
Our cooking demo for December is just that, a simple but SUPER tasty Lamb Knuckle & Vegetable Potjie (compliments to Ina Paarman) and SUPER easy home-made Rooster Koeke with Caramelized Onions.
|
|
For more detailed photos with comments of this demonstration and the recipe's please follow the link to our Facebook Page.
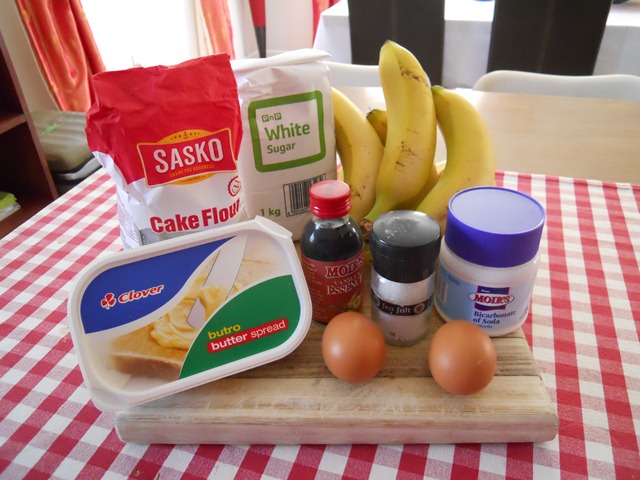
Banana Bread & Muffins
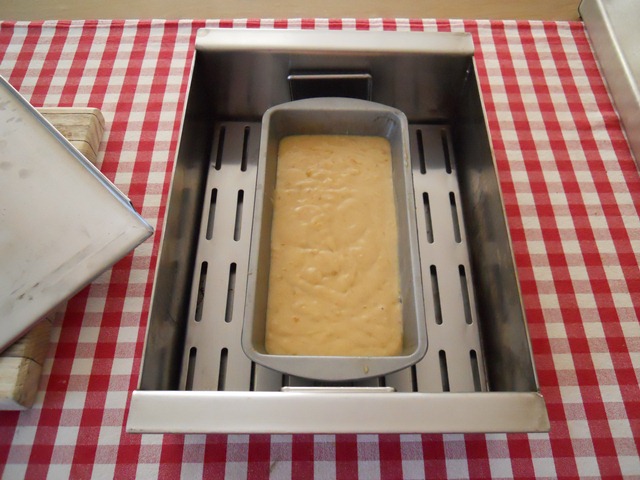
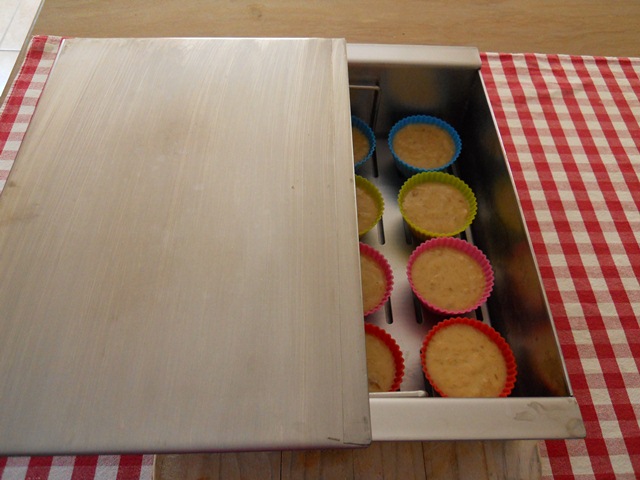
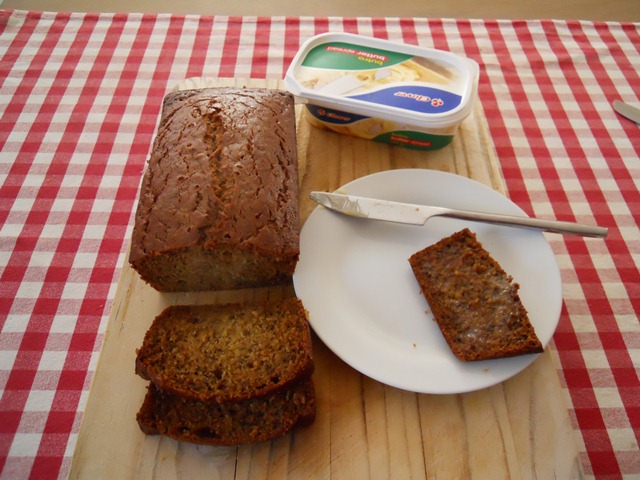

Who would've thought that Banana Bread or Banana Muffins could be part of your Camping/ 4x4 Menu and nogal baked in a BRAAI? No smoky smell or taste, it's like it was baked in your own oven!
This month we stepped it up a bit by baking a banana bread as well as banana muffins with the same recipe! The recipe is really quick and easy, no fancy utensils and only a small amount of ingredients! For this "we-know-you'll-love-it" recipe you need: 4 Banana's (the riper the better), 80ml Melted Butter, 1 Cup of Sugar, 1 Egg Beaten, 1 Teaspoon Vanilla, 1 Teaspoon Baking Soda, 375ml Cake Flour and a Pinch of Salt.
This month we stepped it up a bit by baking a banana bread as well as banana muffins with the same recipe! The recipe is really quick and easy, no fancy utensils and only a small amount of ingredients! For this "we-know-you'll-love-it" recipe you need: 4 Banana's (the riper the better), 80ml Melted Butter, 1 Cup of Sugar, 1 Egg Beaten, 1 Teaspoon Vanilla, 1 Teaspoon Baking Soda, 375ml Cake Flour and a Pinch of Salt.
|
|
For more detailed photos with comments of this demonstration please follow the link to our Facebook Page .
Funky Pizza's
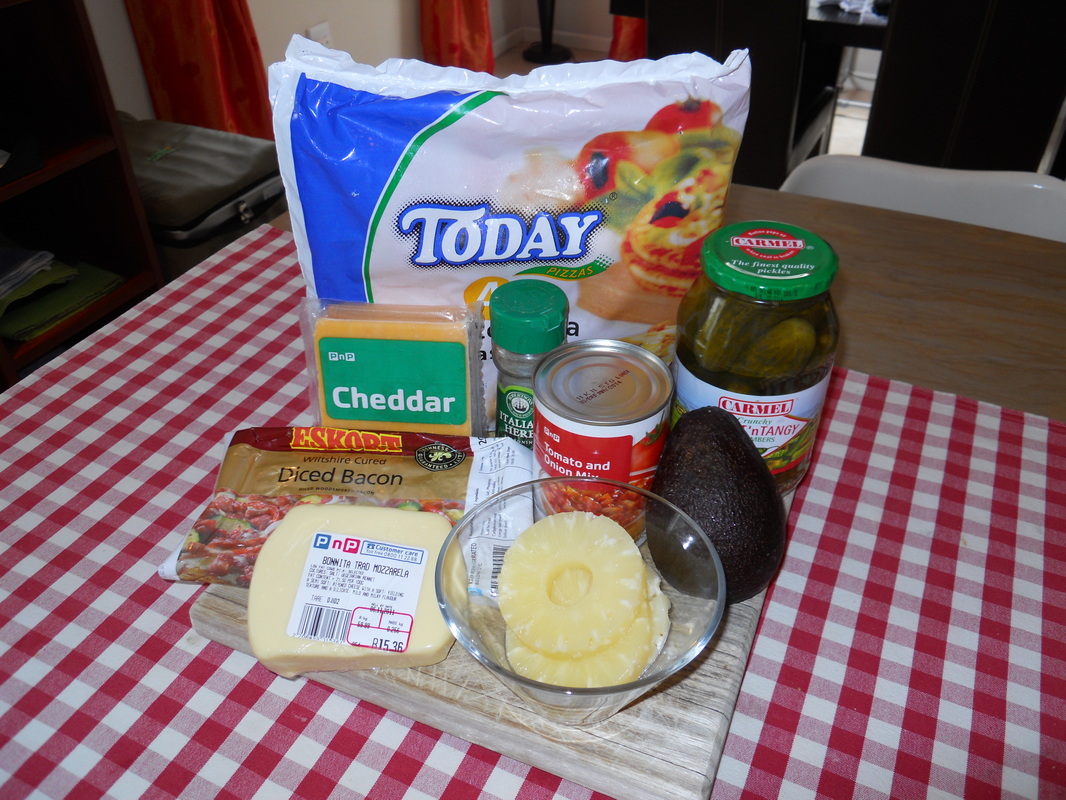
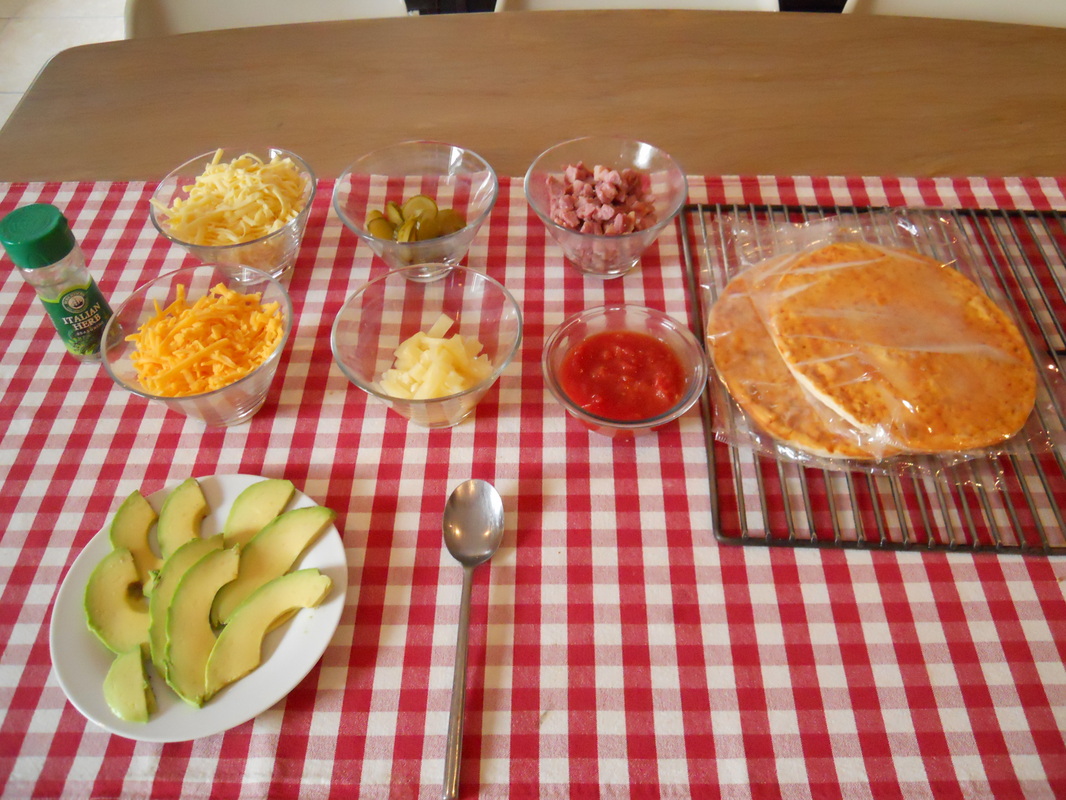

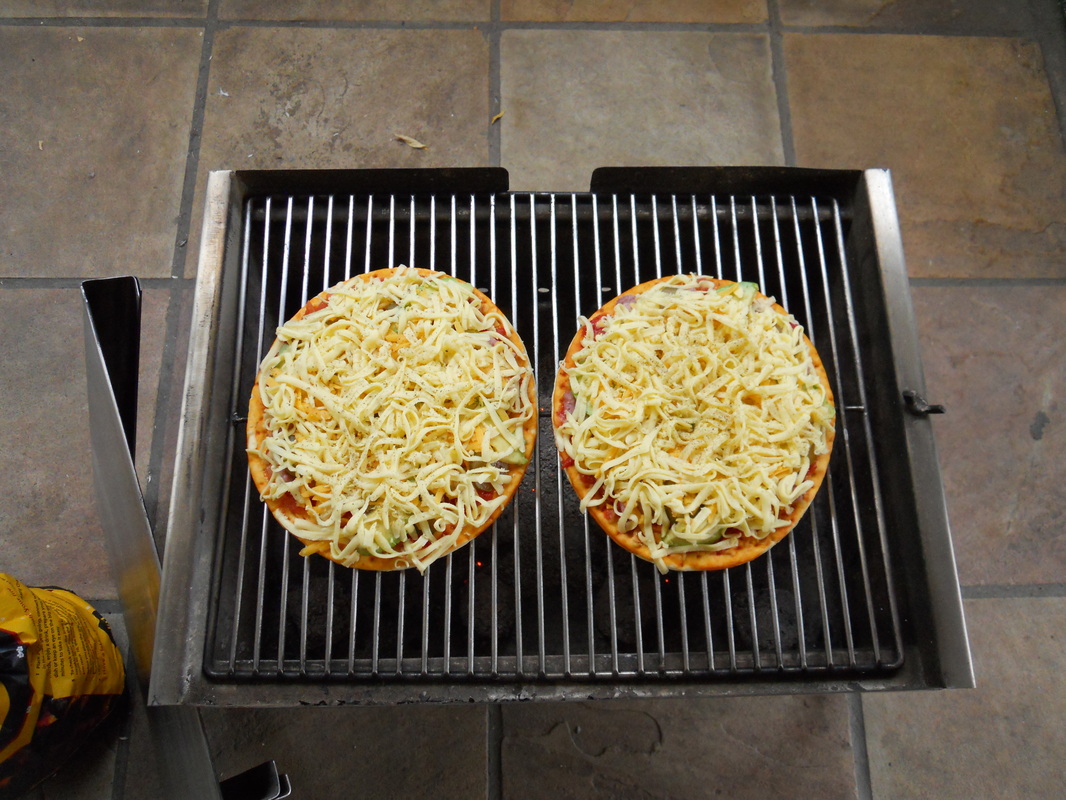
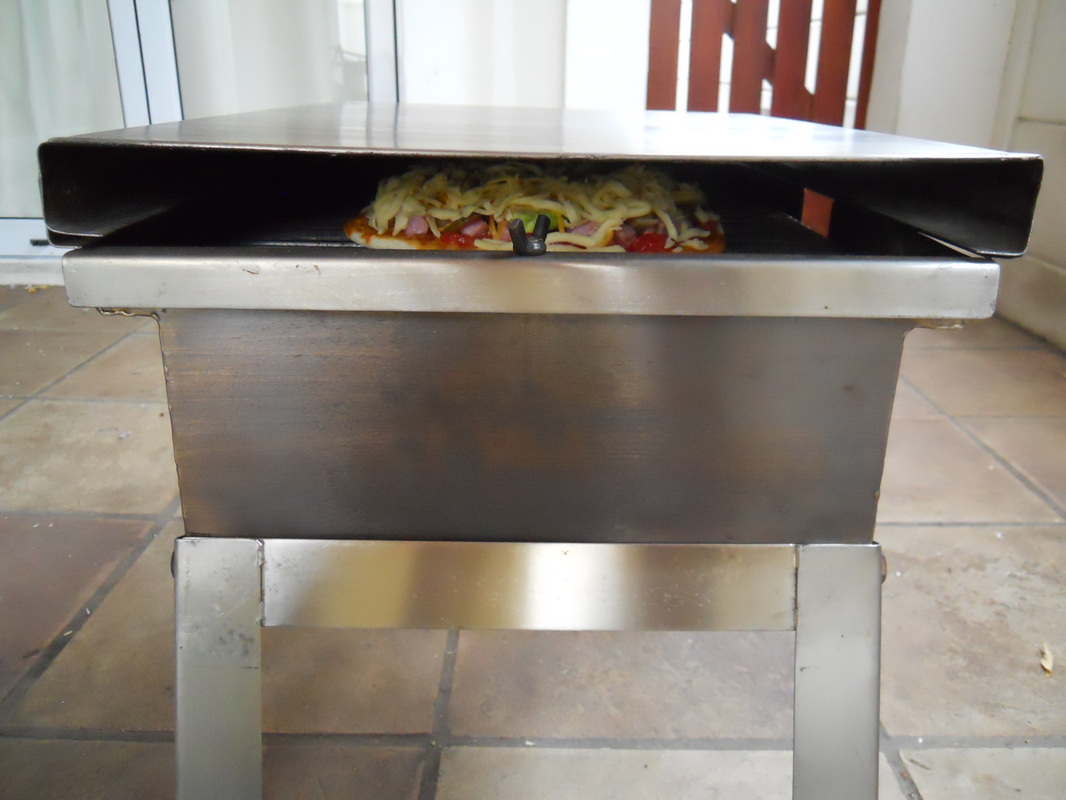
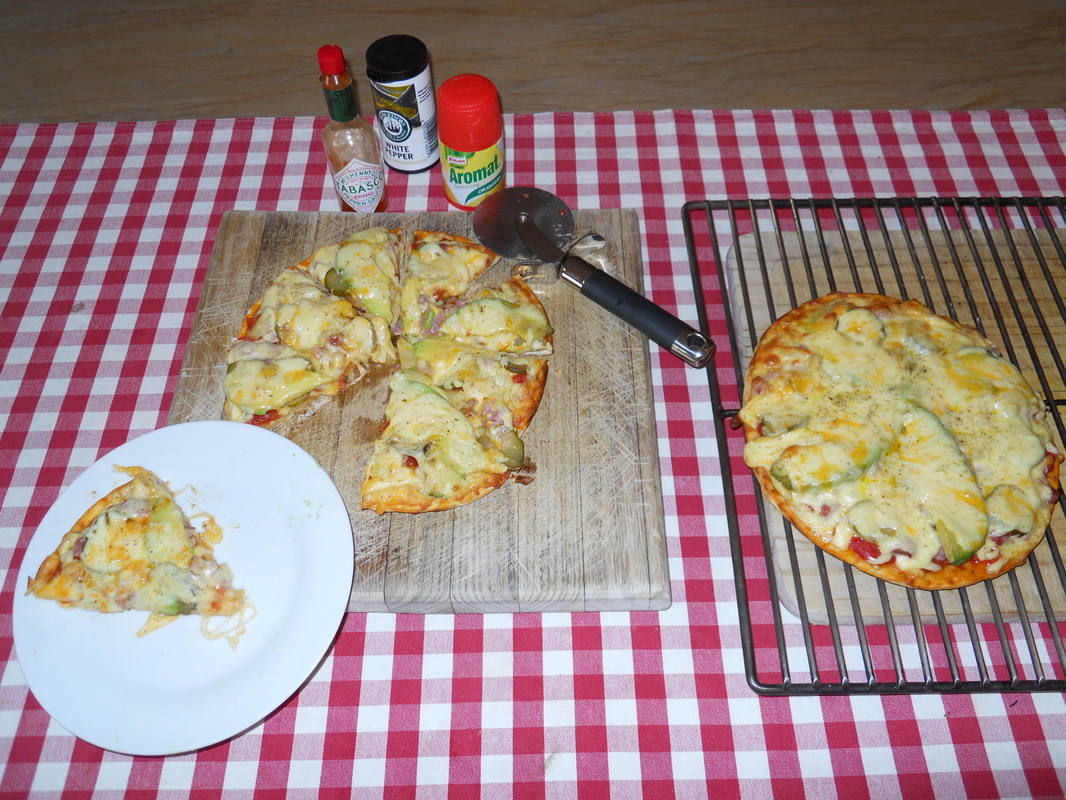
To make these VERY easy and VERY yummy pizza's you'll need the following basics: Today Pizza Bases (4 in a pack) Mozzarella Cheese, Cheddar Cheese, Italian Herb and a Tomato and Onion or just Tomato relish.
|
|
For more detailed photos with comments of this demonstration please follow the link our Facebook Page .
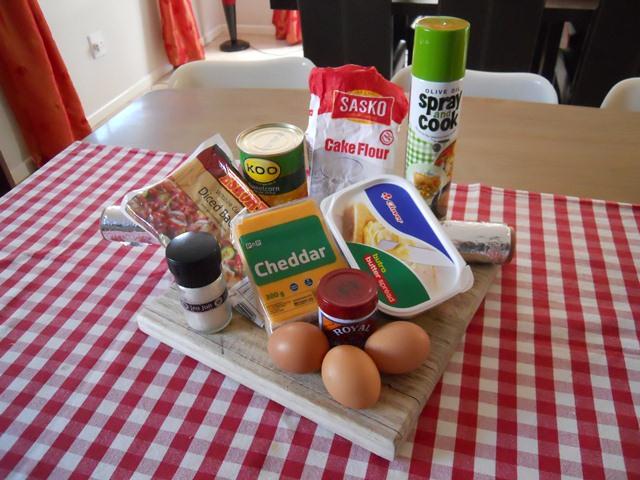
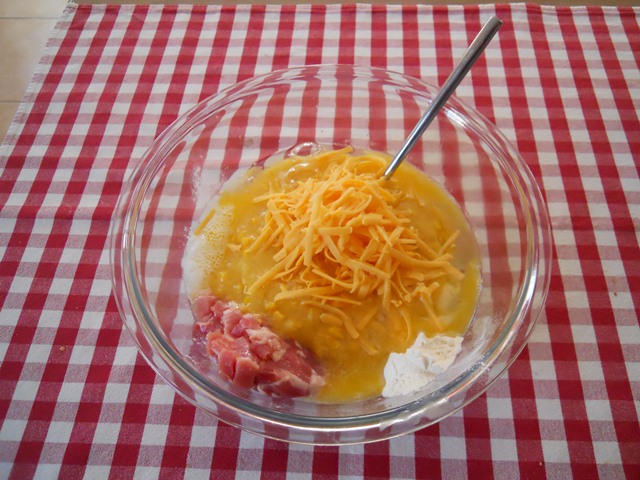
Savoury or Sweet Sweetcorn Bake

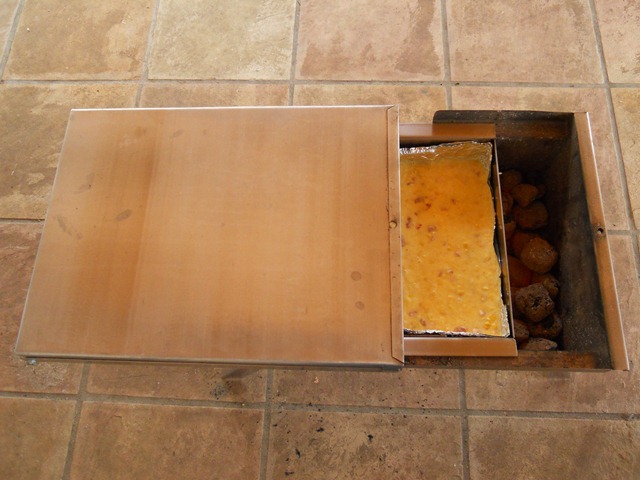
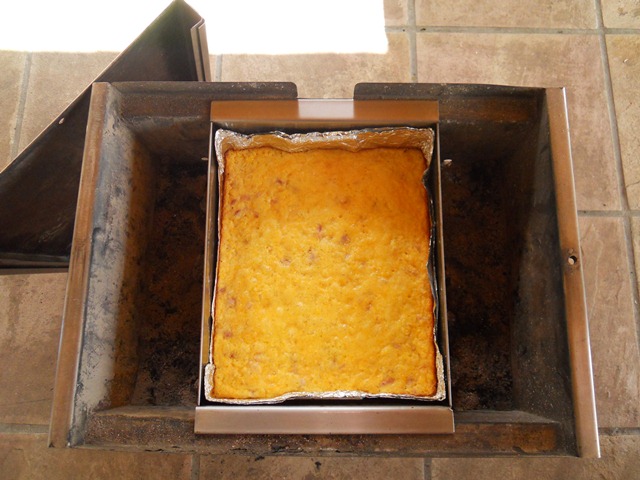
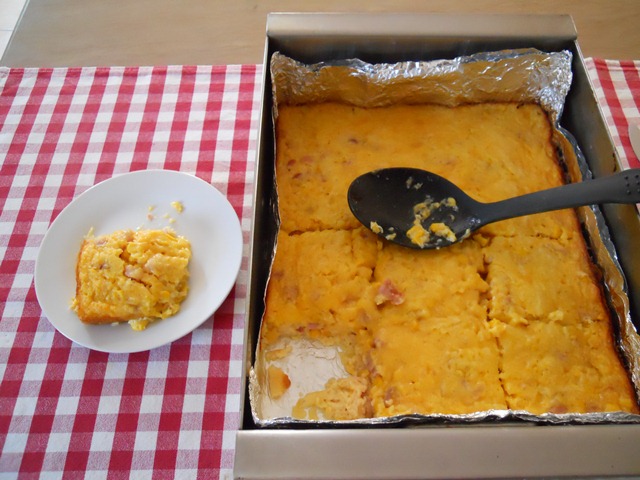
I found this Sweetcorn Bake recipe on the internet a year or two ago and it quickly became a family favourite! It's great as a braai side dish or even as a light meal with a crispy salad.
All you need is: 1 x Tin 420g Sweetcorn, 3 Extra Large Eggs, 15ml Baking Powder, 60 ml Cake Flour, 60ml Melted Butter, 250g Chopped Bacon and 250ml Cheese (1 cup) and a pinch of Salt. Please note, we doubled up on this recipe for the cooking demo.
All you need is: 1 x Tin 420g Sweetcorn, 3 Extra Large Eggs, 15ml Baking Powder, 60 ml Cake Flour, 60ml Melted Butter, 250g Chopped Bacon and 250ml Cheese (1 cup) and a pinch of Salt. Please note, we doubled up on this recipe for the cooking demo.
|
|
For more detailed photos with comments of this demonstration please follow the link to our Facebook Page .
Roasted Leg of Lamb
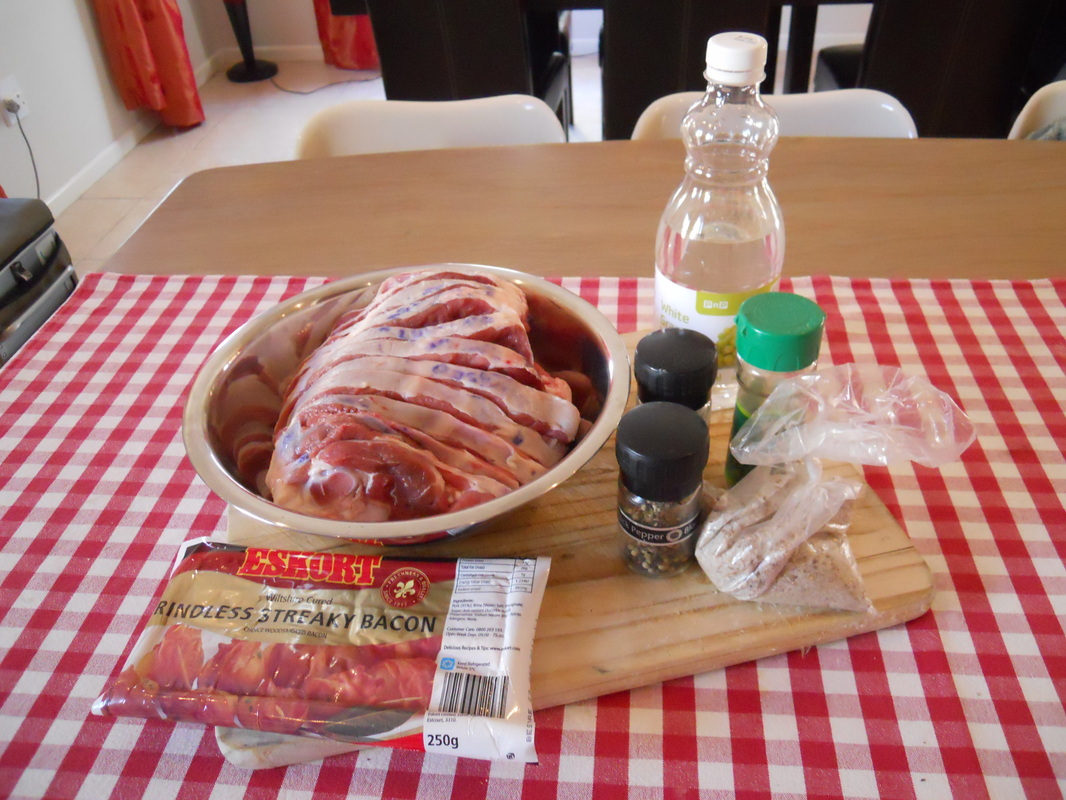
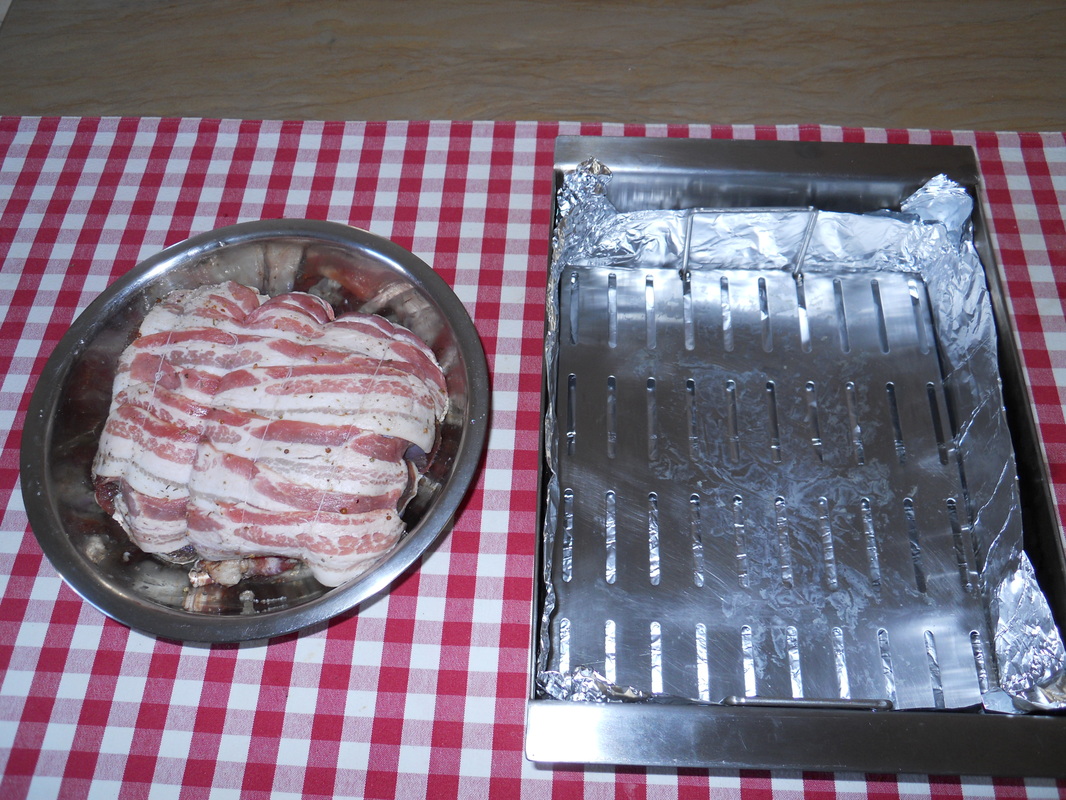
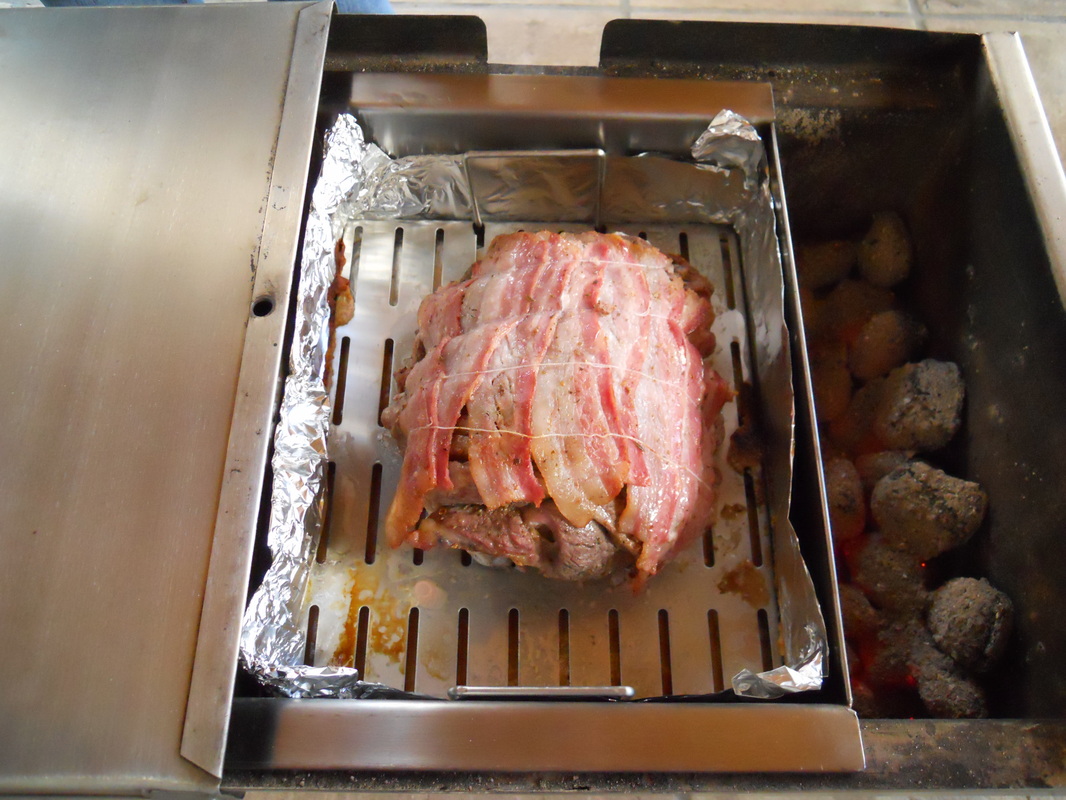


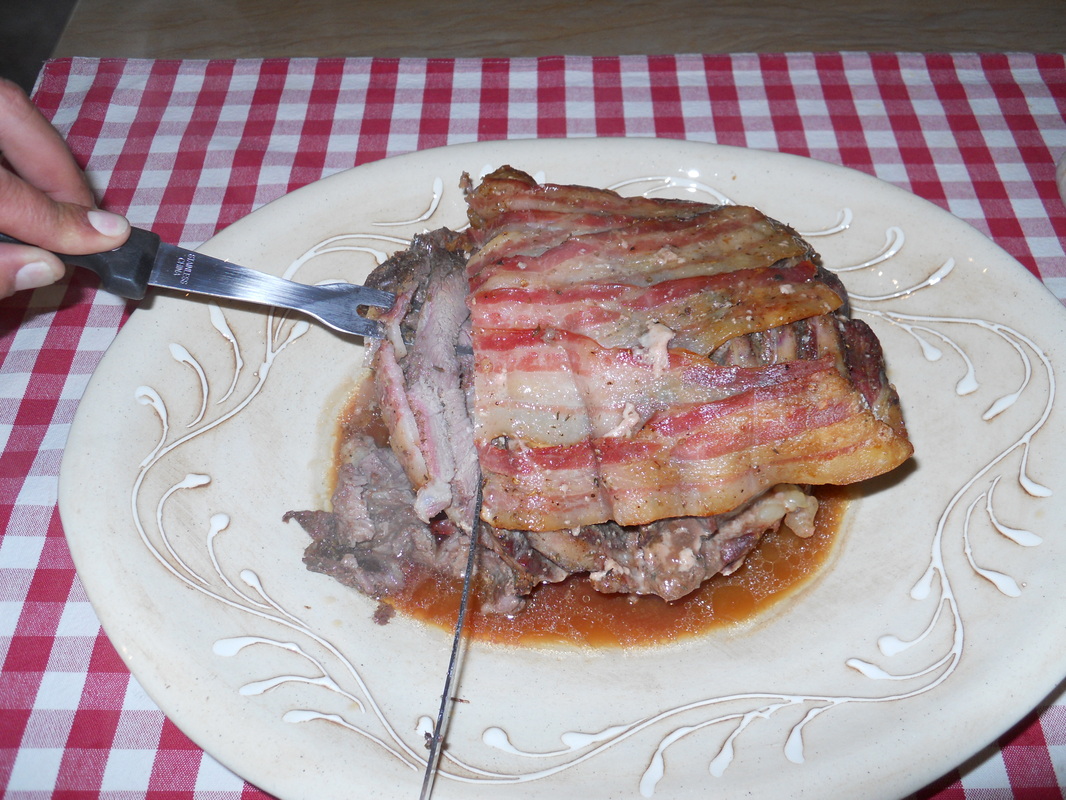
All you need for this delicious and VERY easy meal is; 1.5-2kg Leg of Lamb, Herbs, Spices, Salt, Pepper, Streaky Bacon, Vinegar and String!
Cut 1cm strips through the leg of lamb, to the bone, and rub with herbs, spices, salt and pepper. NB: Try not to be too heavy handed with the salt as it will be rubbed directly onto the meat where-after it needs to rest for 5 hours, which could result in overly salty meat - we know from experience ;)
Cut 1cm strips through the leg of lamb, to the bone, and rub with herbs, spices, salt and pepper. NB: Try not to be too heavy handed with the salt as it will be rubbed directly onto the meat where-after it needs to rest for 5 hours, which could result in overly salty meat - we know from experience ;)
|
|
For more detailed photos with comments of this demonstration please follow the link to our Facebook Page .
Crustless Breakfast Quiche
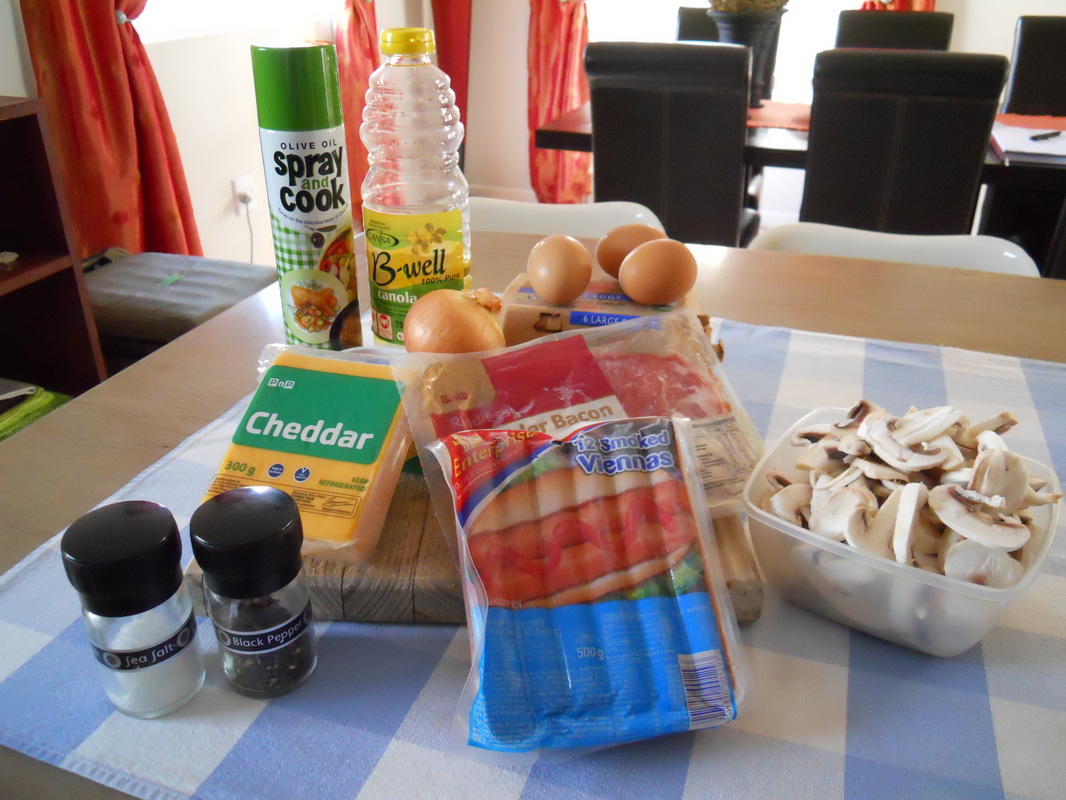
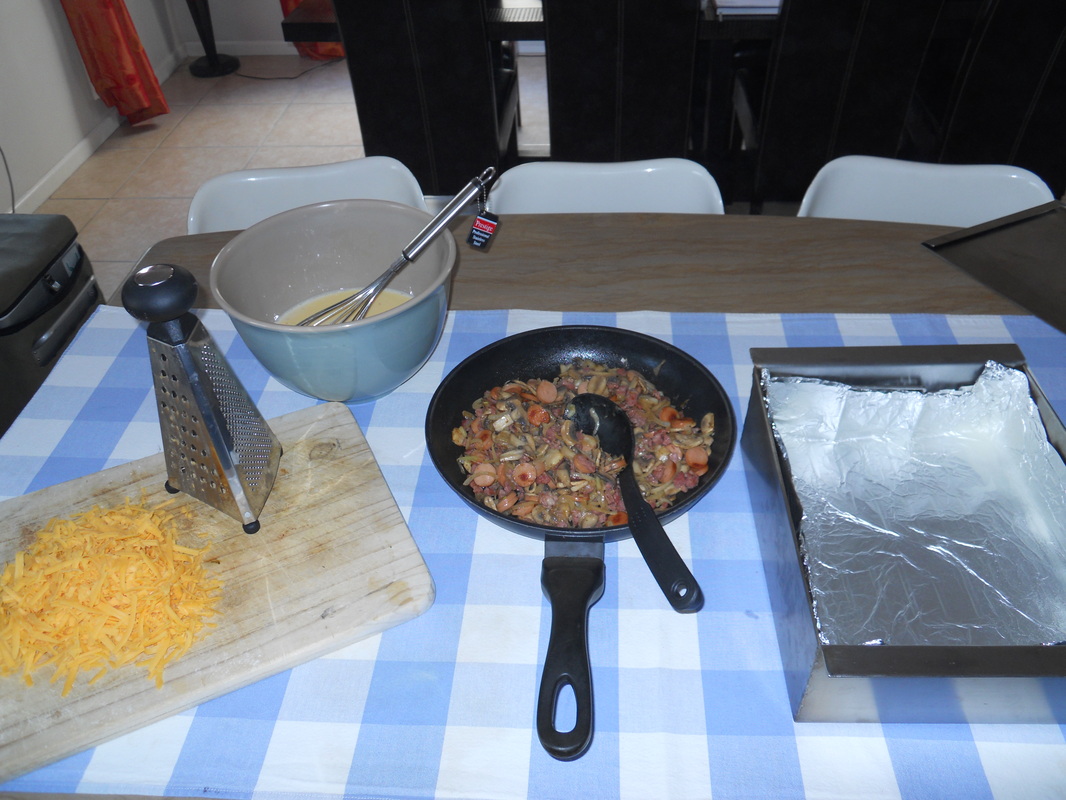
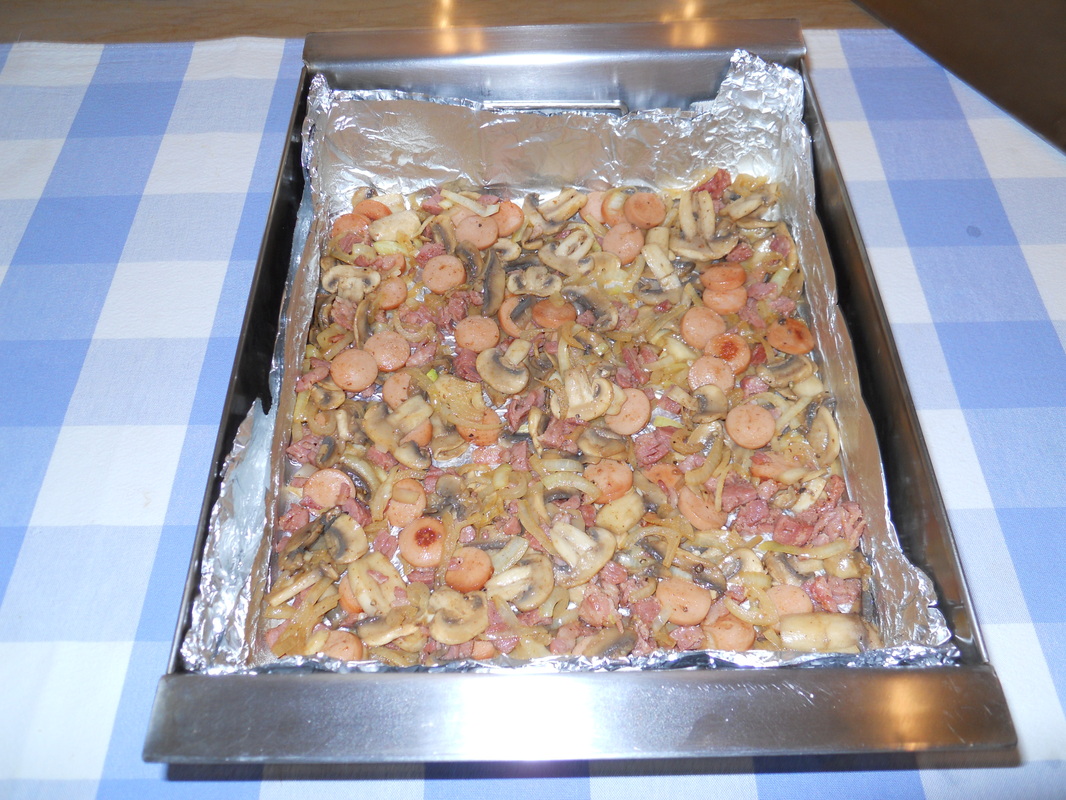
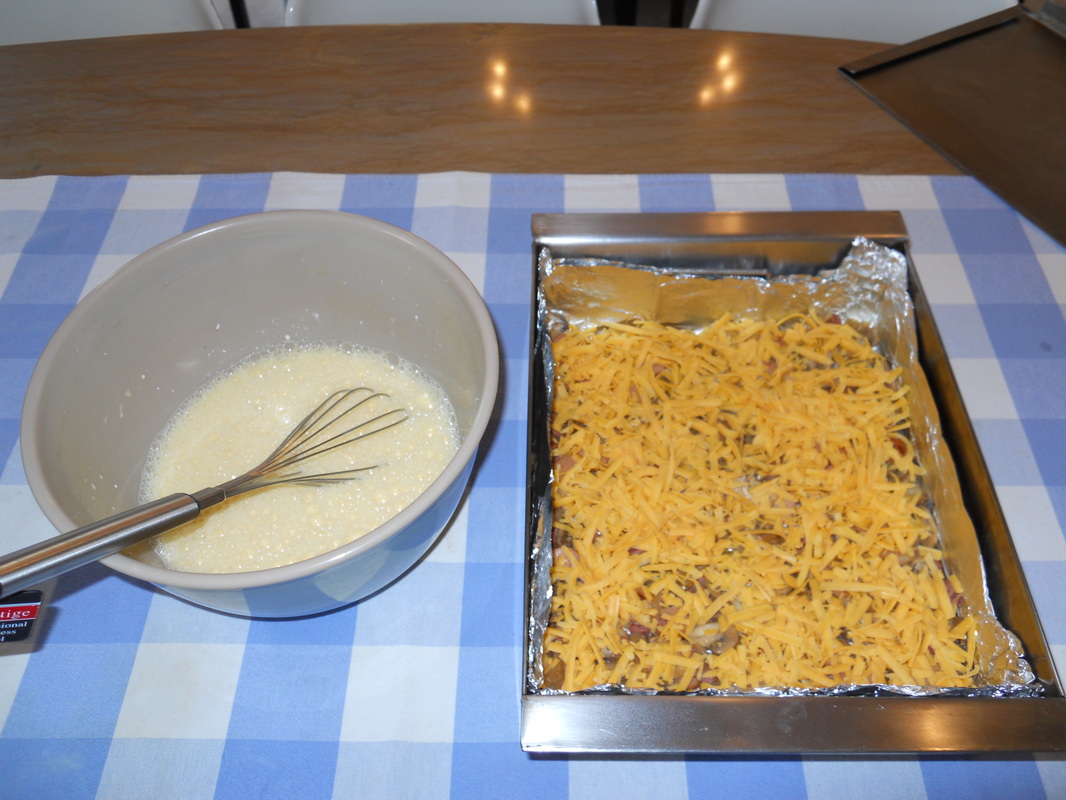
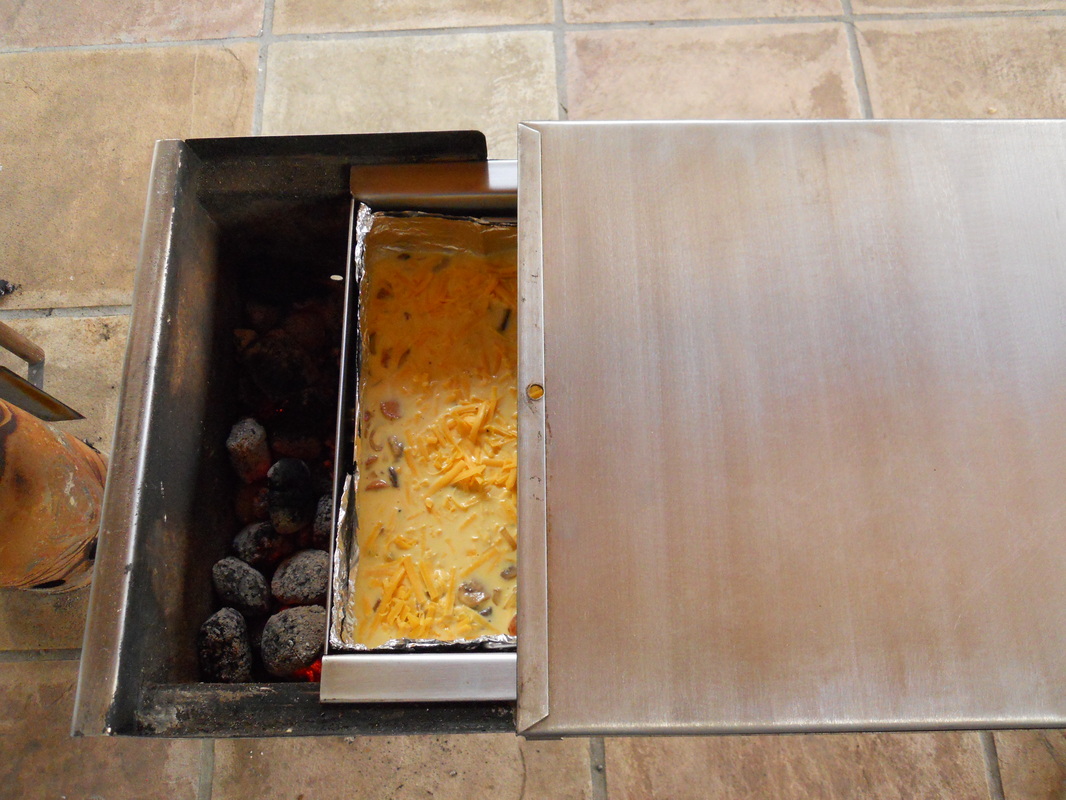

Quiche is a quick and easy way to stretch your available ingredients and feed a few hungry mouths quickly AND it's also a great way to recycle the previous night's braai left-overs!
For this cooking demo we used a simple easy recipe for you to try out and change or improve according to your own taste. Ingredients as follow: 8 Large eggs, Half a packet of bacon chopped, 3-4 vienna’s sliced, 1 Punnet of white mushrooms sliced, 2 Cups of grated cheddar cheese, 200ml Full cream milk, 1 Medium onion sliced, Salt & Pepper to taste and Cooking oil.
For this cooking demo we used a simple easy recipe for you to try out and change or improve according to your own taste. Ingredients as follow: 8 Large eggs, Half a packet of bacon chopped, 3-4 vienna’s sliced, 1 Punnet of white mushrooms sliced, 2 Cups of grated cheddar cheese, 200ml Full cream milk, 1 Medium onion sliced, Salt & Pepper to taste and Cooking oil.
|
|
For more detailed photos with comments of this demonstration please follow the link to our Facebook Page .
Spicy (or not ...) Enchilada's
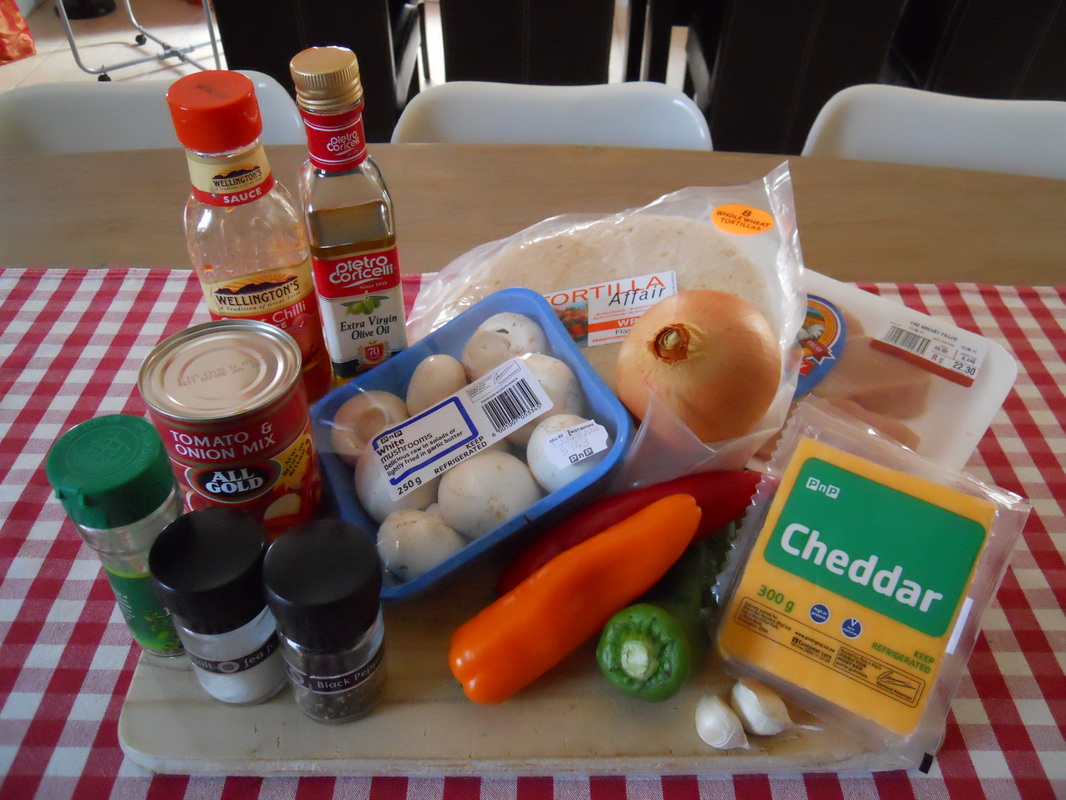
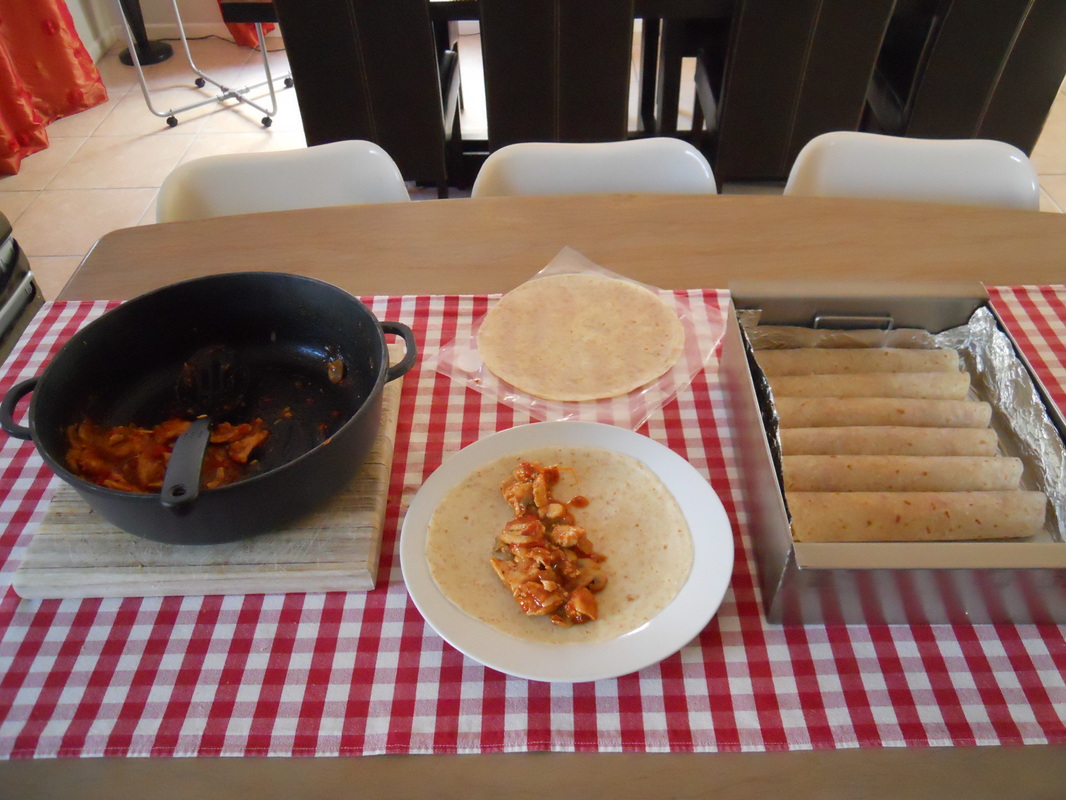

Enchilada's is a great way to recycle some left over braai meat, boerewors and chicken AND a easy way to serve something different on those long over-landing/ camping trips.
Most of the ingredients needed to make this dish is already part of the "hardy" camper or 4x4-er's must have groceries. You can easily swop the fresh mushrooms for tinned ones, the fresh garlic for crushed garlic and the fresh peppers for marinated peppers or relish. The only new extra is the tortilla's/ wraps which can be frozen and easily slid into the side of your camping fridge without taking up any extra space.
Most of the ingredients needed to make this dish is already part of the "hardy" camper or 4x4-er's must have groceries. You can easily swop the fresh mushrooms for tinned ones, the fresh garlic for crushed garlic and the fresh peppers for marinated peppers or relish. The only new extra is the tortilla's/ wraps which can be frozen and easily slid into the side of your camping fridge without taking up any extra space.
|
|
For more detailed photos with comments of this demonstration please follow the link to our Facebook Page .
Warm up with Bobotie
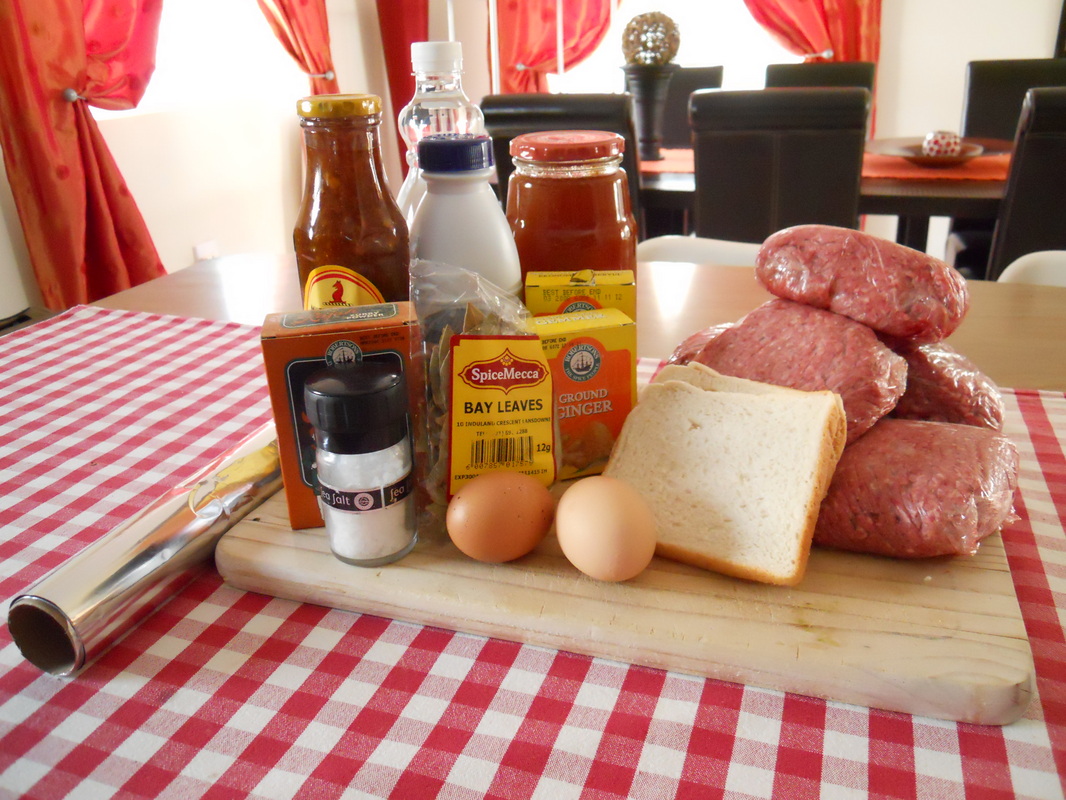
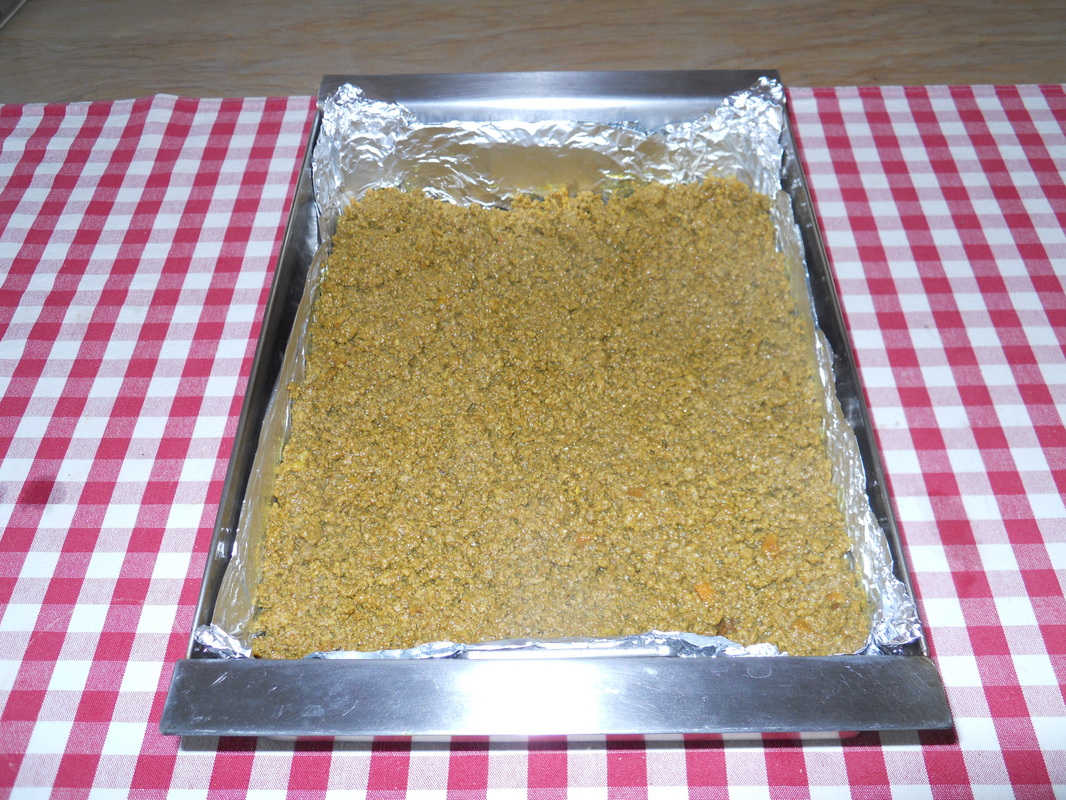
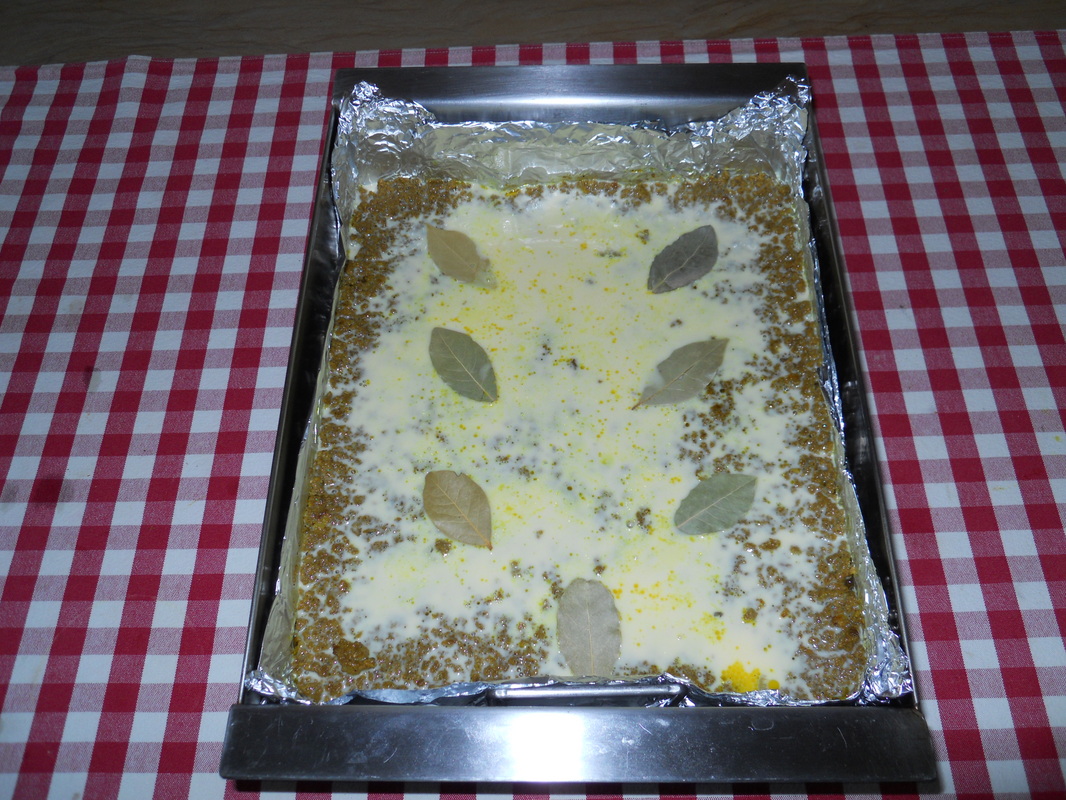
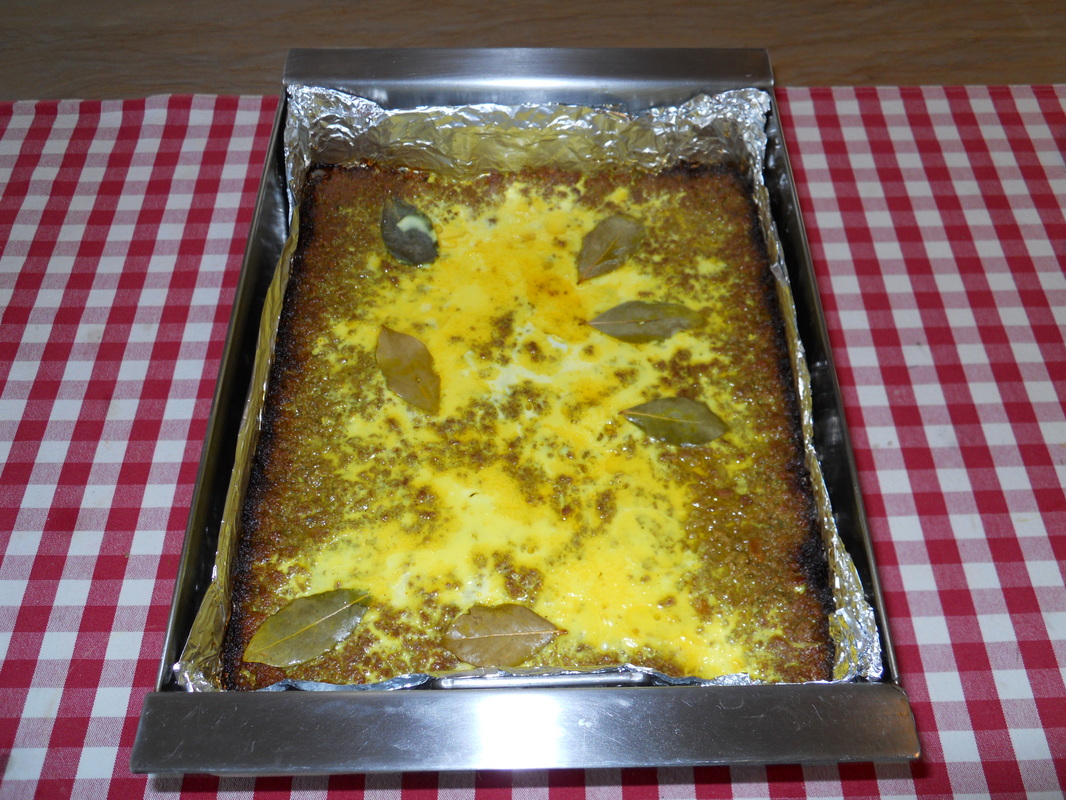
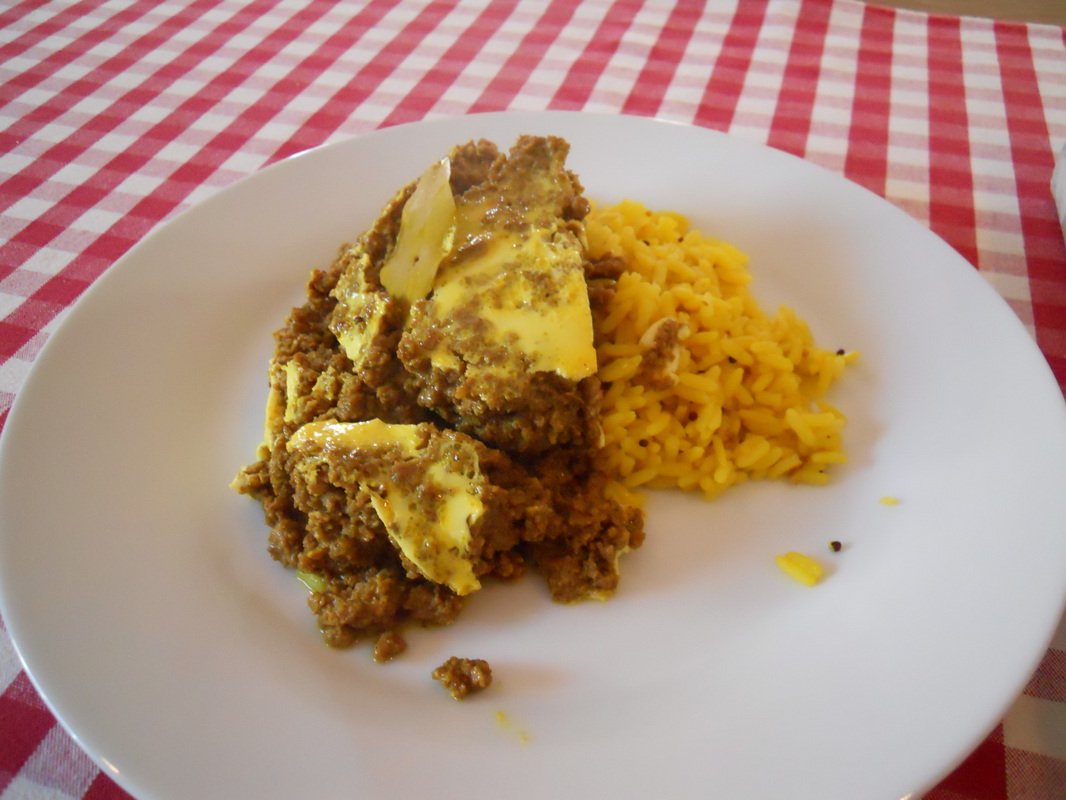
Warm up your winter camping or 4x4 menu with a true South-African favourite - Bobotie!
For this meal you need your trusted Bobotie recipe and a hungry family! You will need to double up on your ingredients to fill the whole braaibak with a nice thick layer of mince. My original recipe indicated use of 1kg of mince, I doubled it up to 2kg and it worked like a charm.
For this meal you need your trusted Bobotie recipe and a hungry family! You will need to double up on your ingredients to fill the whole braaibak with a nice thick layer of mince. My original recipe indicated use of 1kg of mince, I doubled it up to 2kg and it worked like a charm.
|
|
For more detailed photos with comments of this demonstration please follow the link to our Facebook Page .
Lekkerrr Lasagna
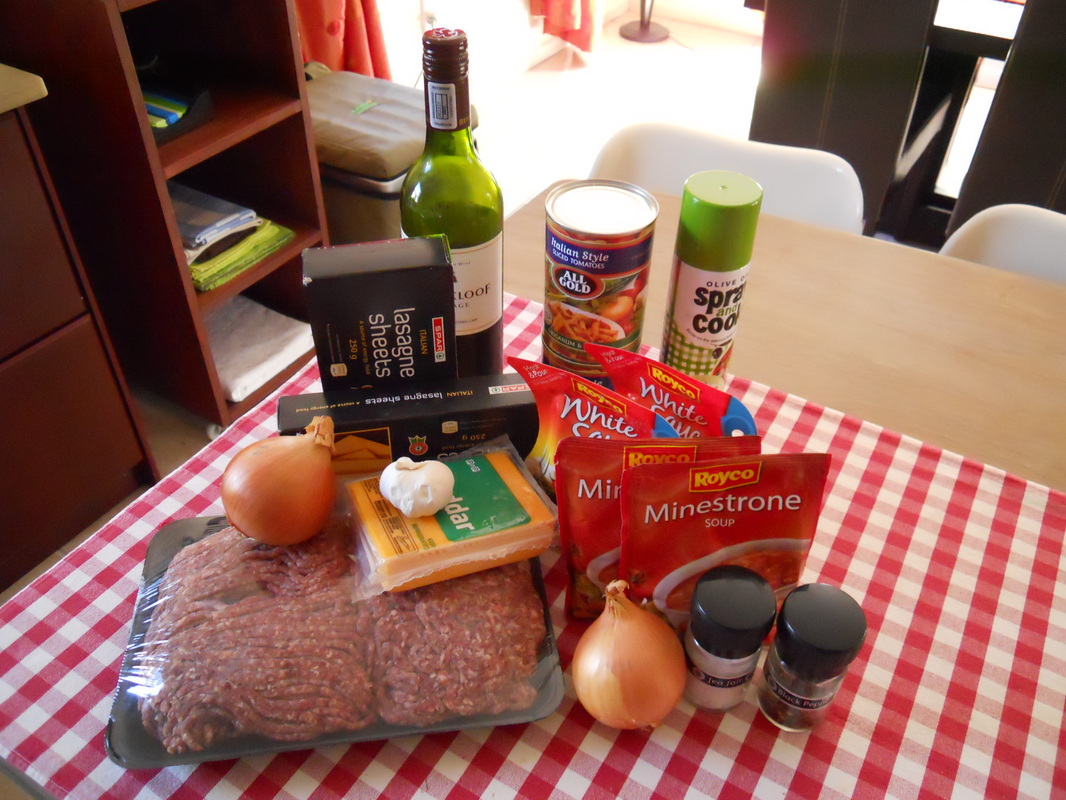
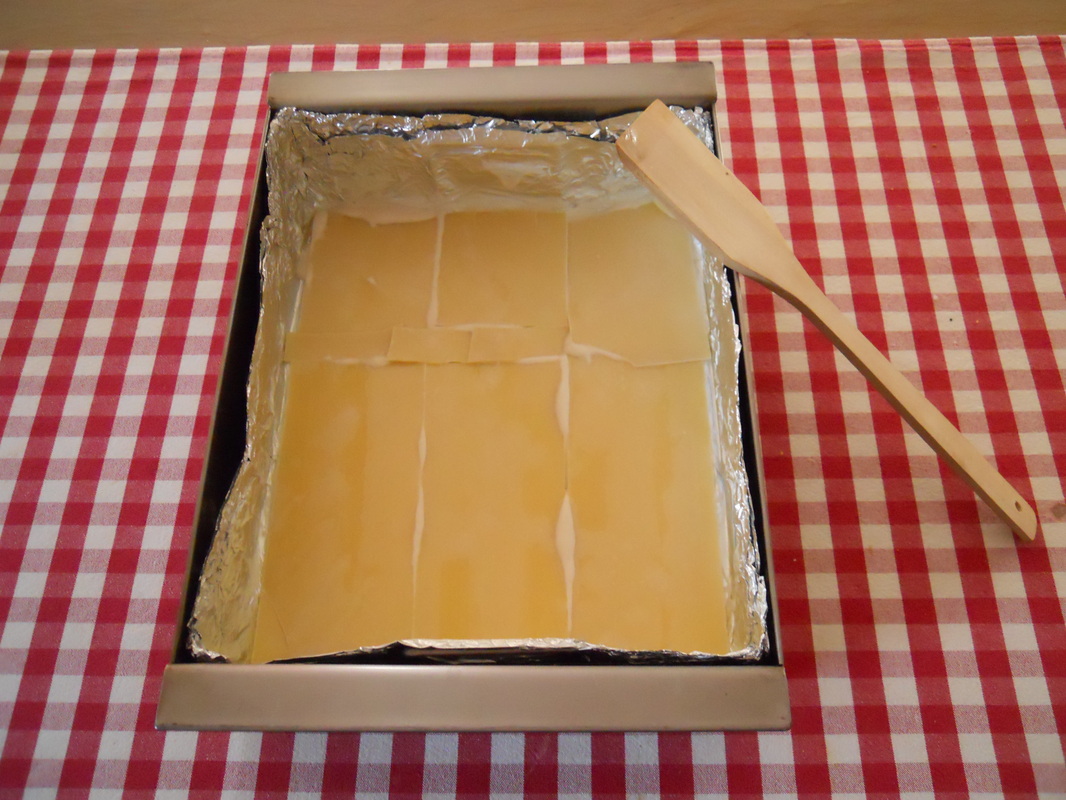

Now you too can make a Lekker Homemade Lasagna on your camping or 4x4 holiday!
Get your basic lasagna ingredients together and start cooking! One box of lasagna sheets will be sufficient for 3 layers of lasagna and 1.2 - 1.5kg of mince will be sufficient to fill the whole braai bak up to 3/4 and to lay 3 layers of lasagna.
Get your basic lasagna ingredients together and start cooking! One box of lasagna sheets will be sufficient for 3 layers of lasagna and 1.2 - 1.5kg of mince will be sufficient to fill the whole braai bak up to 3/4 and to lay 3 layers of lasagna.
|
|
For more detailed photos with comments of this demonstration please follow the link to our Facebook Page .
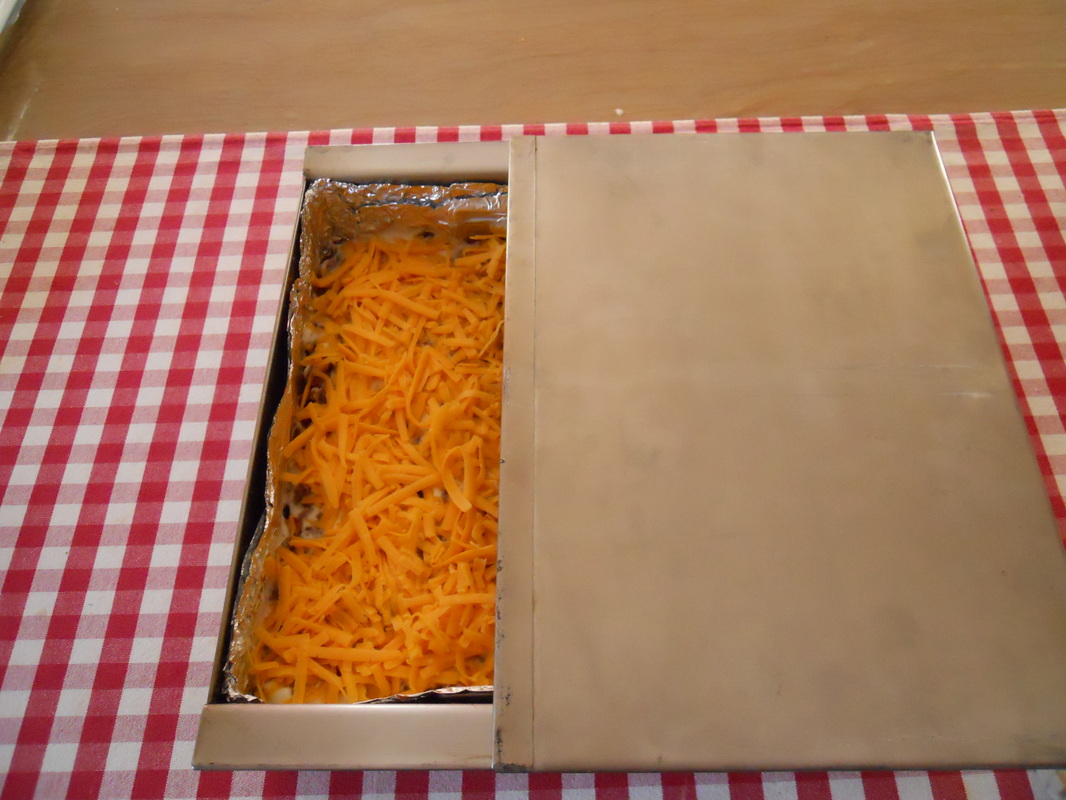
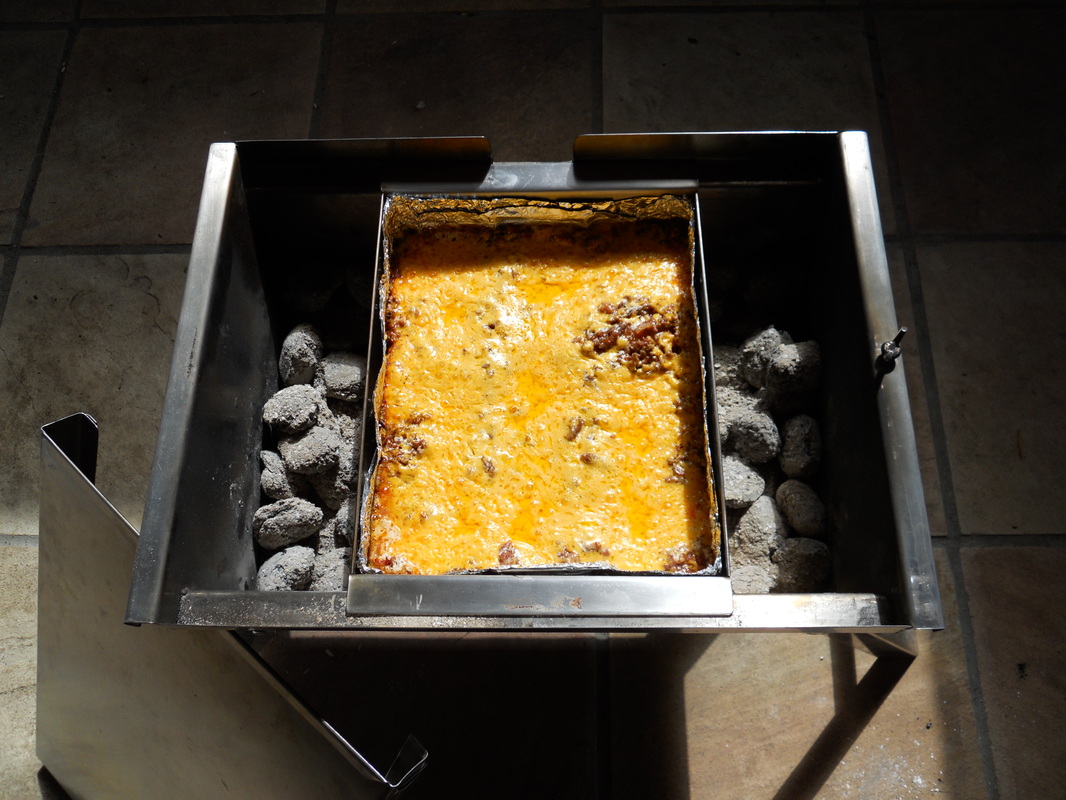
Savoury Bread
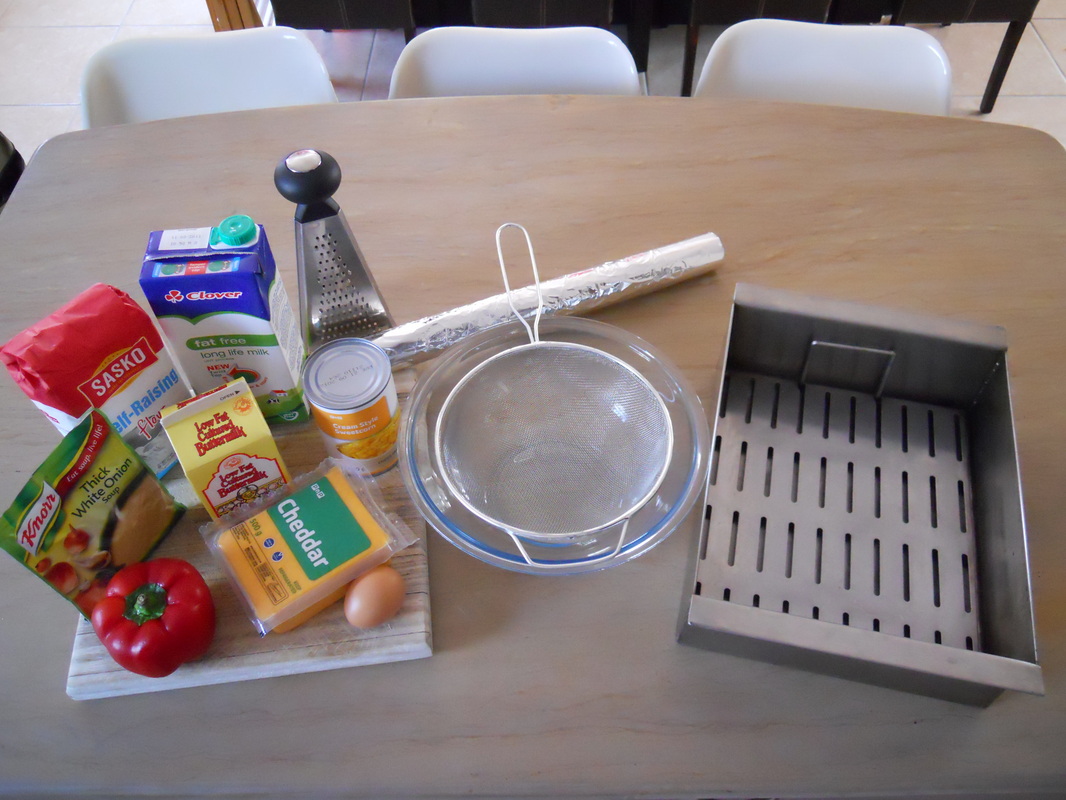
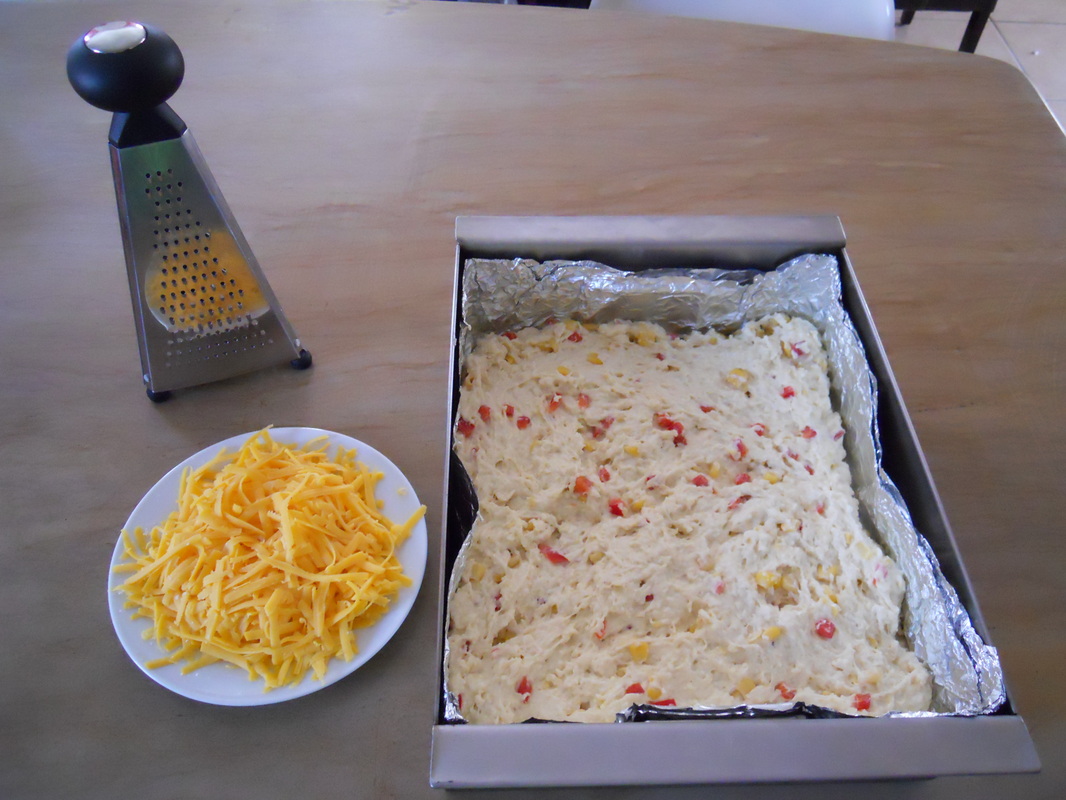
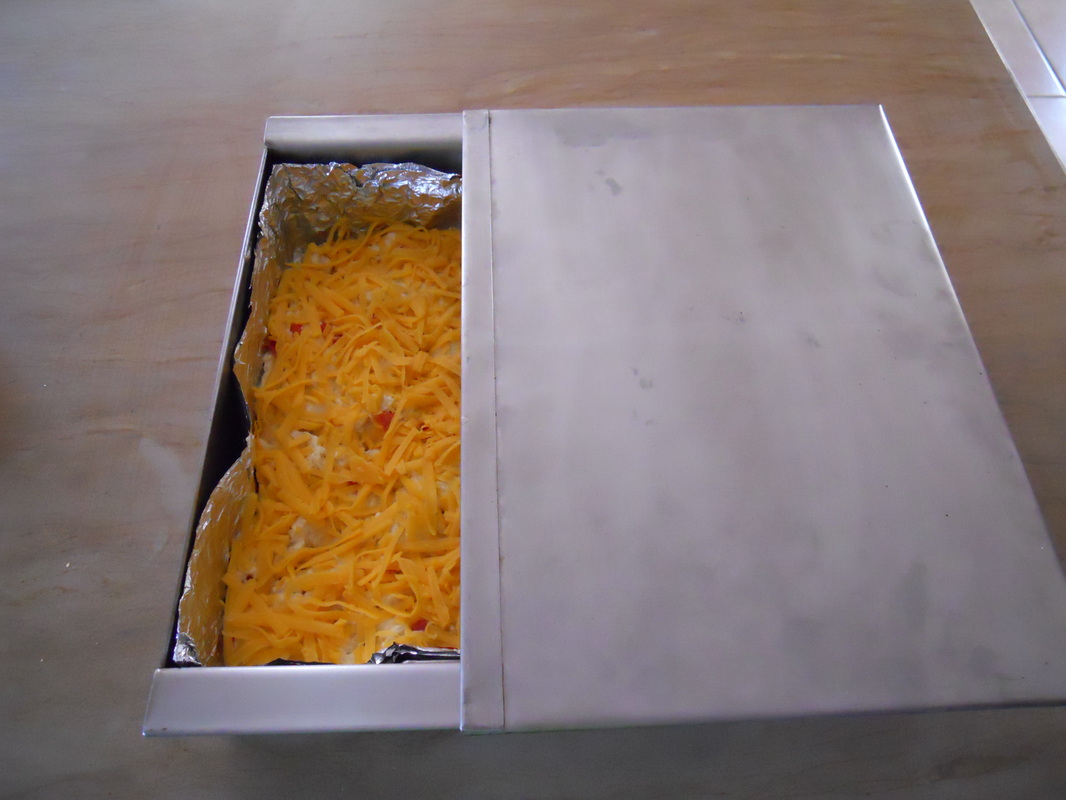
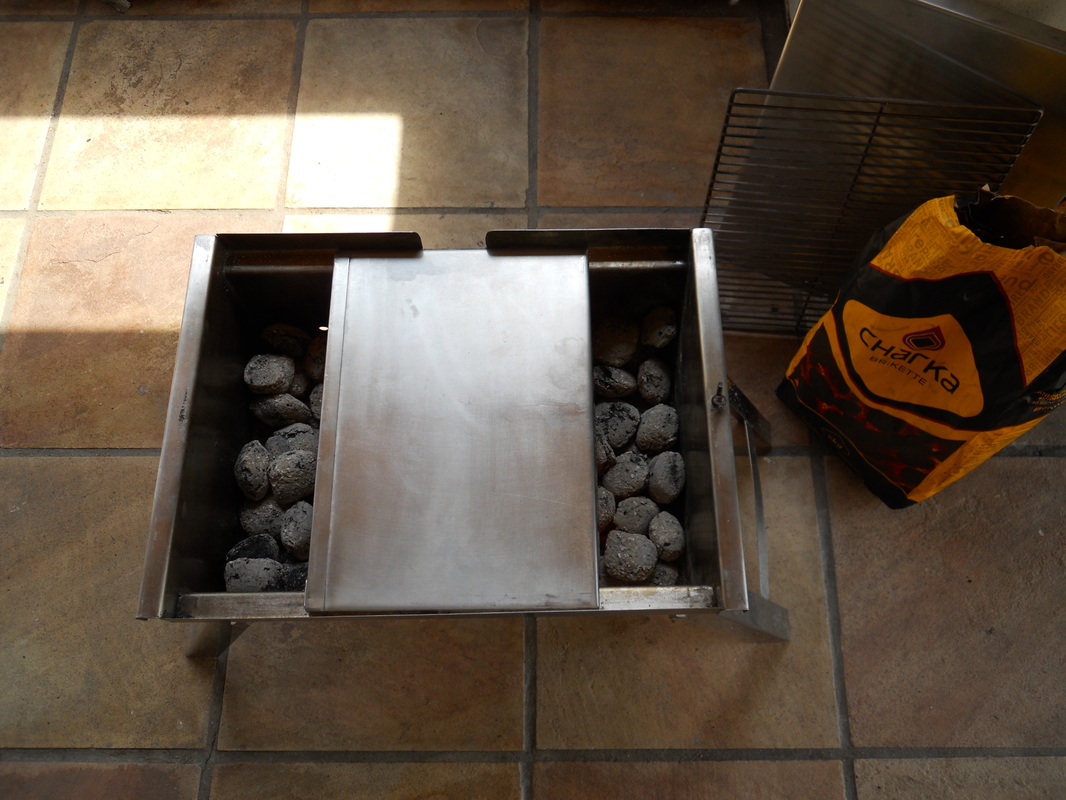
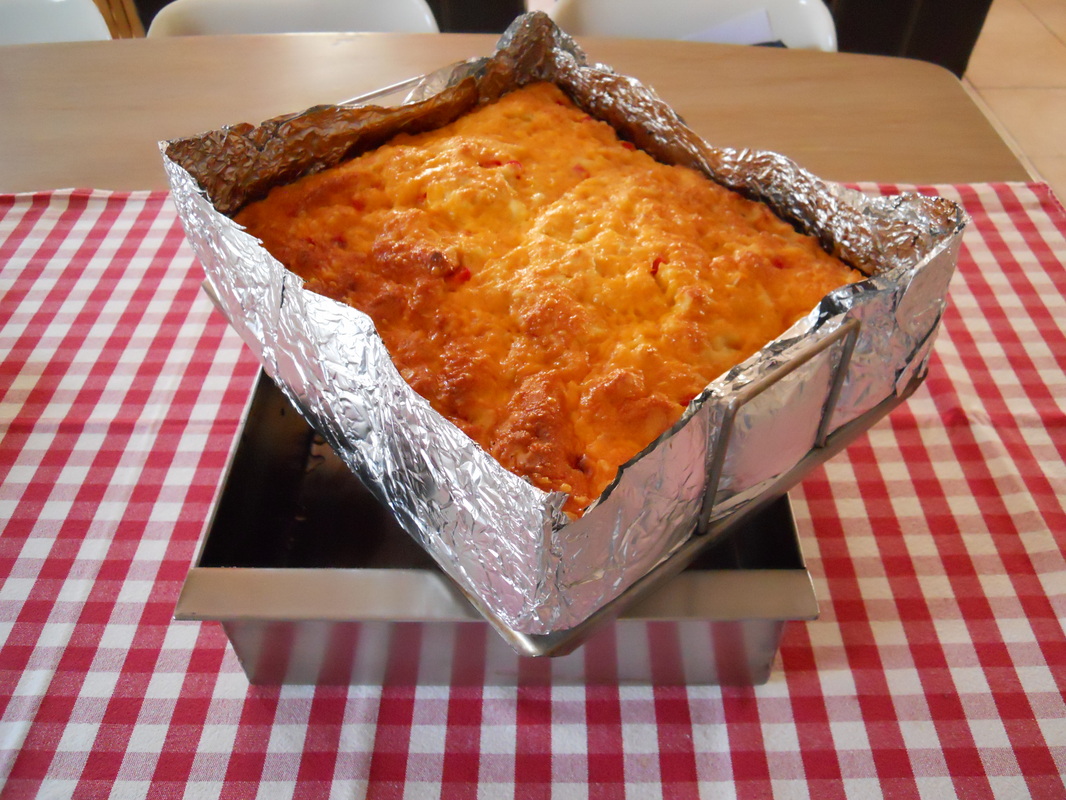
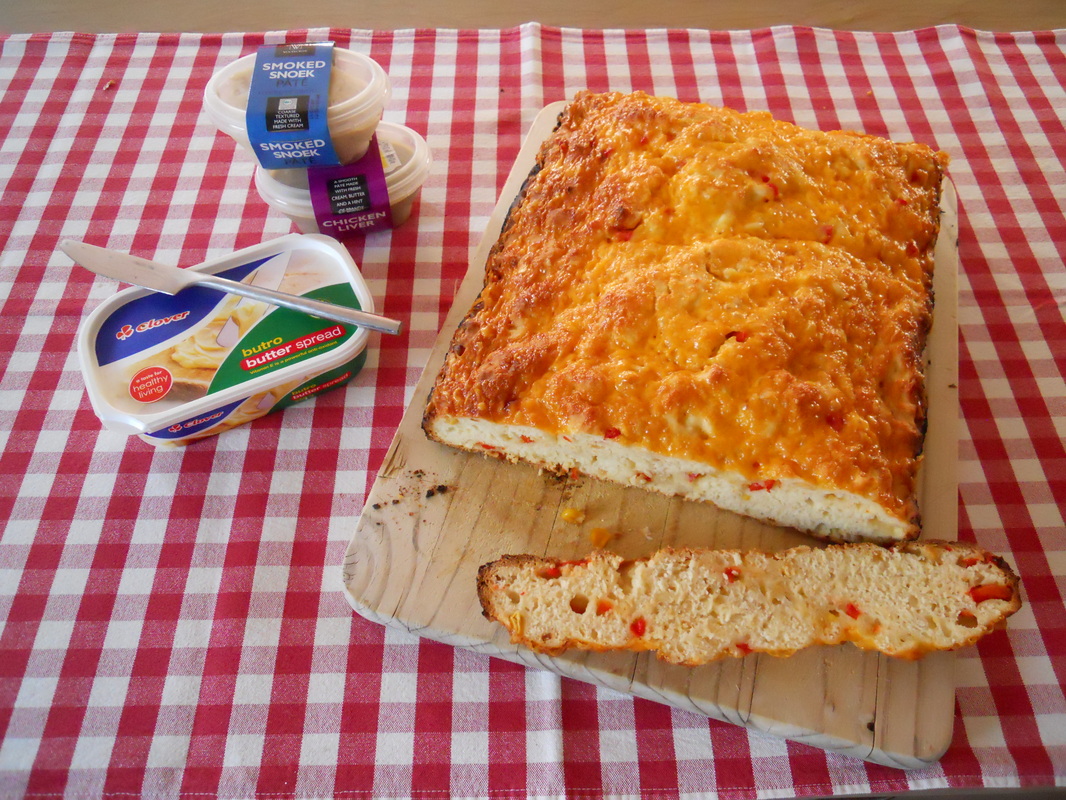
This month we show you how to make a DEFINITE WINNER BREAD in your KSC Braai & Braaibak!
The ingredients: 1 kg Self Raising Flour, 500 ml Buttermilk, 1 x Packet White Onion Soup, 1 x Tin Sweetcorn, 1 x Red Pepper finely chopped, 1 x Egg, 2 x cups Grated Cheddar Cheese & Milk as needed. Mix all the ingredients together, except the cheese. The result should be a sticky dough mixture!
The ingredients: 1 kg Self Raising Flour, 500 ml Buttermilk, 1 x Packet White Onion Soup, 1 x Tin Sweetcorn, 1 x Red Pepper finely chopped, 1 x Egg, 2 x cups Grated Cheddar Cheese & Milk as needed. Mix all the ingredients together, except the cheese. The result should be a sticky dough mixture!
|
|
For more detailed photos with comments of the demonstration please follow the link to our Facebook Page .
Grilled Chicken
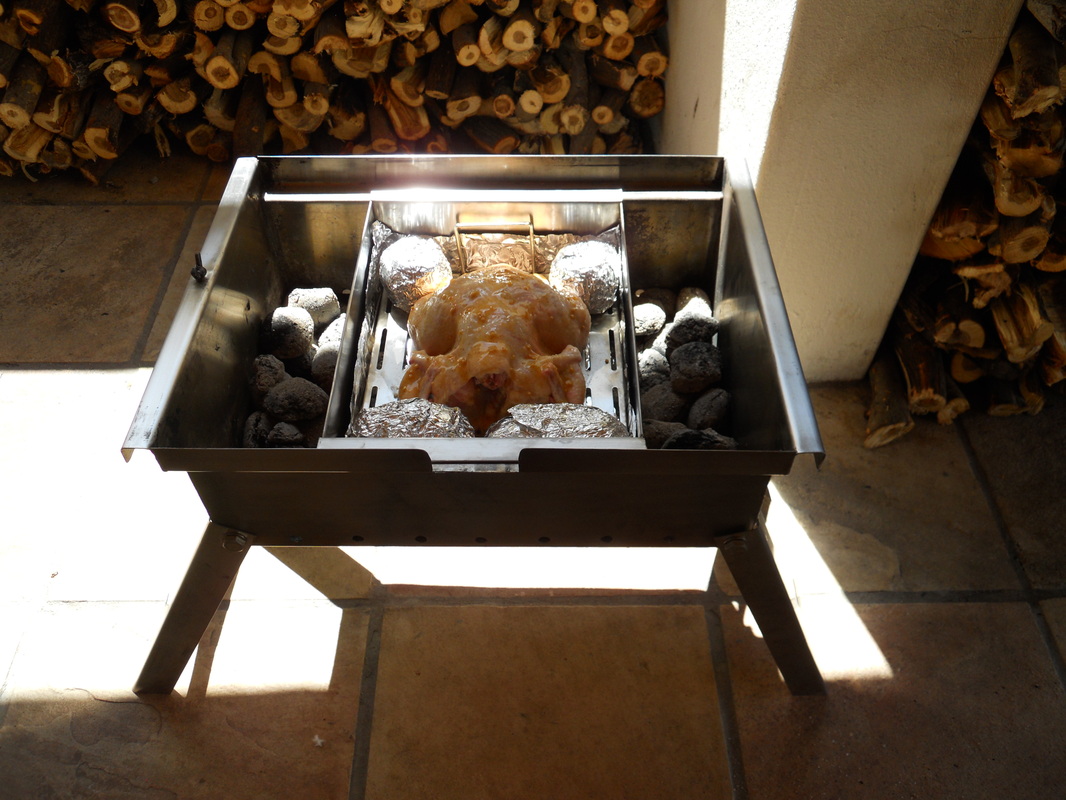

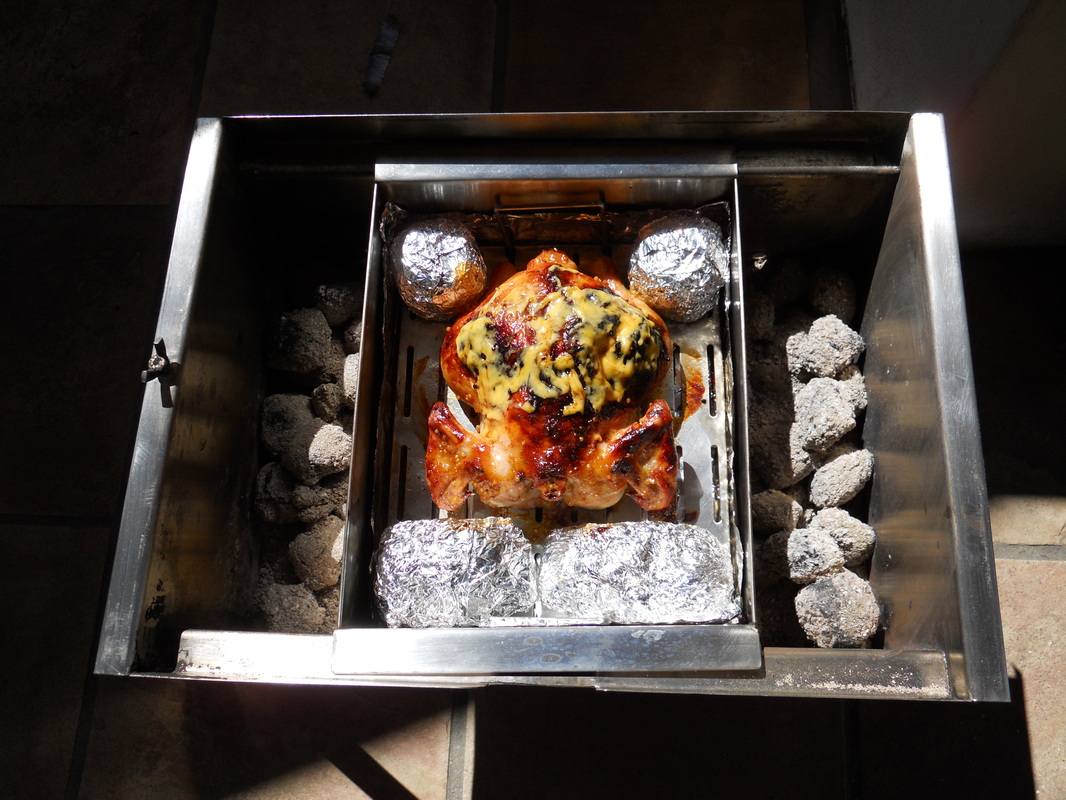
Our first cooking demonstration is of a Juicy Grilled Chicken, to serve for either lunch or dinner!
|
|
For more detailed photos with comments of this demonstration please follow the link to our Facebook Page .
